You can sometimes fix a knock sensor fault without replacing the sensor by repairing wiring, cleaning connectors, correcting mounting problems, or fixing real engine knock.
For drivers in the United States, a knock sensor fault can appear as a check engine light, reduced power, hesitation, or a stored diagnostic trouble code such as P0325 or P0330. A code does not automatically prove that the sensor itself has failed. The fault can also come from damaged wiring, a poor electrical connection, corrosion, incorrect installation, or an engine problem that creates abnormal combustion.
A knock sensor detects high-frequency vibration from combustion and sends a signal to the engine control module. The module can use that information to adjust ignition timing. Because the sensor is part of the engine control system, the safest approach is to diagnose the complete circuit before buying a replacement sensor. Vehicle-specific specifications always take priority because sensor design, wiring, voltage tests, resistance values, and mounting procedures differ by model.
This guide explains how to fix a knock sensor without replacing it when the underlying problem is repairable. It also explains when a sensor replacement is actually necessary, because cleaning or resetting a failed sensor will not restore a damaged sensing element.
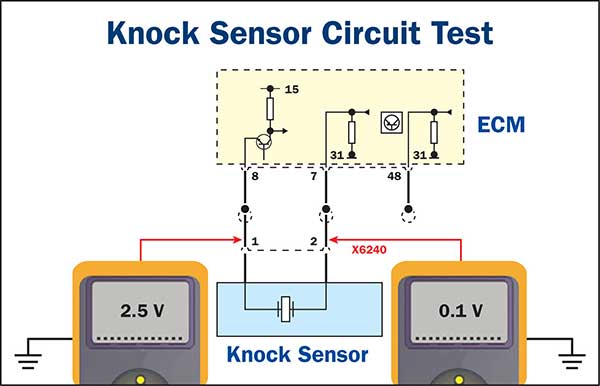
Source: 2carpros.com
Can You Fix a Knock Sensor Without Replacing It?
Yes, but only when the sensor is still functional and the actual fault is somewhere else in the system. A knock sensor is an electronic sensing device, commonly built around a piezoelectric element. If the element has failed internally, there is no reliable cleaning or reset procedure that restores it.
The repairable causes are usually external. Examples include a loose or damaged connector, corroded terminals, broken wiring, a short circuit, poor wiring routing, an incorrect mounting condition, or a real engine problem that causes abnormal combustion. A diagnostic trouble code identifies a monitored fault, not necessarily the failed component.
For example, a P0325 code generally identifies a knock sensor circuit malfunction, while related codes can indicate low input, high input, intermittent operation, or range and performance problems. The exact diagnostic procedure depends on the vehicle.
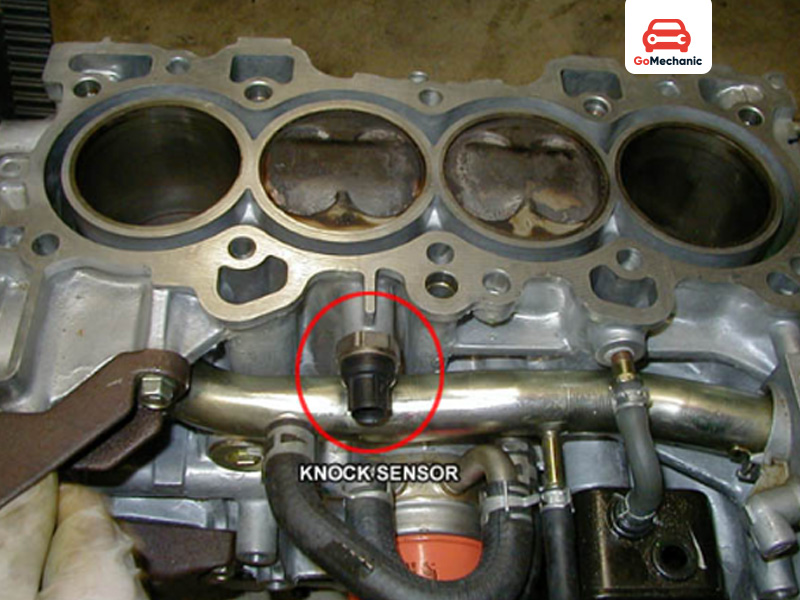
Source: gomechanic.in
Repairable electrical problem
A damaged wire, loose terminal, corroded connector, or poor connection can sometimes be repaired without replacing the sensor.
Repairable mounting problem
A sensor that is loose, incorrectly positioned, or installed contrary to the manufacturer’s procedure may produce an incorrect signal.
Underlying engine problem
Incorrect fuel, abnormal combustion, or a mechanical engine problem can create conditions that trigger knock-related faults. The underlying cause must be addressed.
Failed sensor
If the sensor itself fails its manufacturer-specified electrical or functional tests, replacement is normally required.
What a Knock Sensor Actually Does
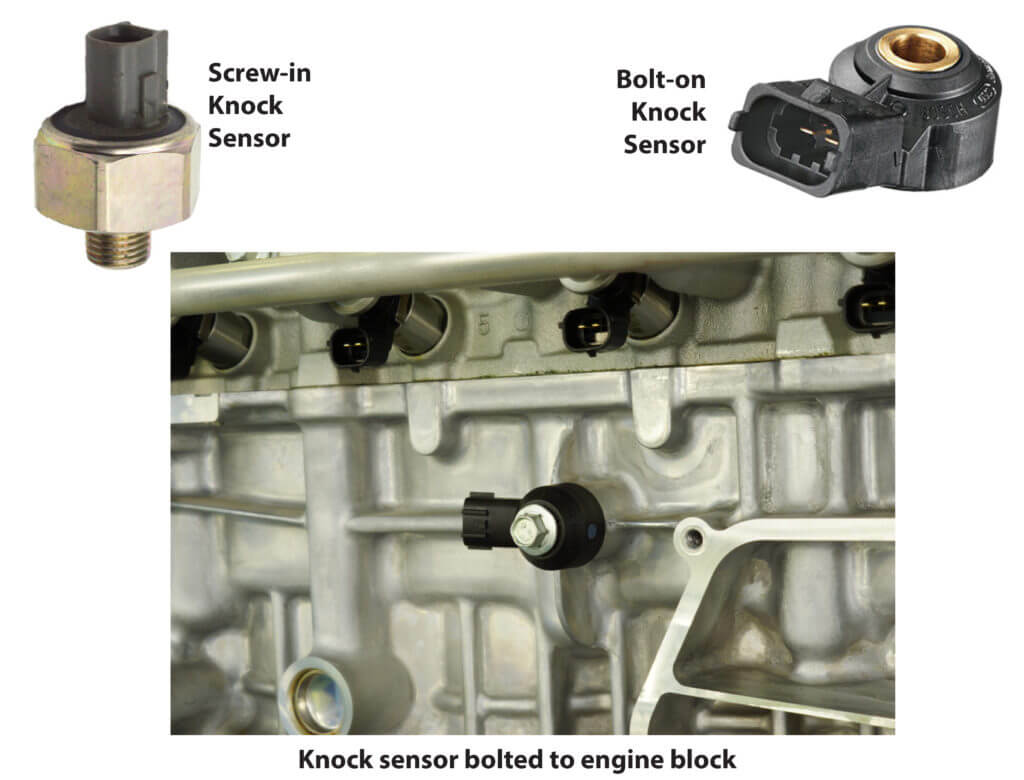
A knock sensor is mounted to the engine so it can detect vibration associated with abnormal combustion. The sensor converts those mechanical vibrations into an electrical signal that the engine control module can interpret.
The system helps the engine control ignition timing. If abnormal combustion is detected, the control module may adjust timing to reduce the condition. A malfunctioning sensor circuit can therefore affect both engine performance and emissions-related operation.
Sensor
Detects characteristic engine vibration and produces an electrical signal.
Wiring
Carries the sensor signal and any required circuit connections to the engine control module.
Engine control module
Processes the signal and uses the information as part of engine control.
Check the Diagnostic Code Before Trying a Repair
Start with an OBD-II scan rather than replacing parts based only on a check engine light. Record every stored and pending code, along with freeze-frame information when your scan tool provides it. The conditions present when the code was stored can help narrow the diagnosis.
Knock sensor codes commonly fall within the P0325 through P0334 range, although the exact codes used depend on the vehicle and system. The description may identify a circuit malfunction, low signal, high signal, intermittent signal, or range and performance problem.
Do not assume that a code naming the knock sensor proves that the sensor is defective. Circuit faults can create the same diagnostic result. Read the manufacturer’s service information for the specific year, engine, and vehicle before performing electrical tests.
Source: safetyfic.com
Record the exact code
Write down the complete DTC, including whether it identifies sensor 1, sensor 2, a bank, or a particular circuit condition.
Check for additional codes
Related engine, ignition, fuel, or sensor codes can provide clues about the actual cause.
Save freeze-frame data
When available, note engine speed, load, temperature, and other recorded conditions from the moment the fault occurred.
Do not clear the code immediately
Clearing the code before recording diagnostic information can remove useful clues.
What P0325 and Similar Codes Can Mean
A P0325-type fault can result from a failed sensor, an open or shorted circuit, damaged wiring, or another control-system problem. Other knock sensor codes can point toward signal levels or performance outside the expected range.
The code should therefore be treated as the beginning of the diagnosis. The manufacturer’s wiring diagram and test specifications are more useful than a generic resistance or voltage number copied from another vehicle.
Circuit fault
The electrical path between the sensor and control module may be open, shorted, damaged, or poorly connected.
Signal problem
The sensor signal may be outside the expected range because of the sensor, wiring, mounting, or operating conditions.
Actual sensor failure
The sensing element may be internally damaged and unable to produce the required signal.
How to Fix a Knock Sensor Without Replacing It
The most useful repair sequence is to inspect the external circuit before condemning the sensor. Work with the engine off unless a specific diagnostic procedure requires otherwise, keep hands and tools away from moving components, and allow hot engine parts to cool before working around the sensor.
Do not unplug or probe connectors on a running engine unless the vehicle service procedure specifically calls for that test. Some knock sensors are located in difficult areas, and some are mounted where coolant or other fluids may be present. Follow the manufacturer’s safety instructions.
Source: pinterest.com
Step 1: Inspect the connector
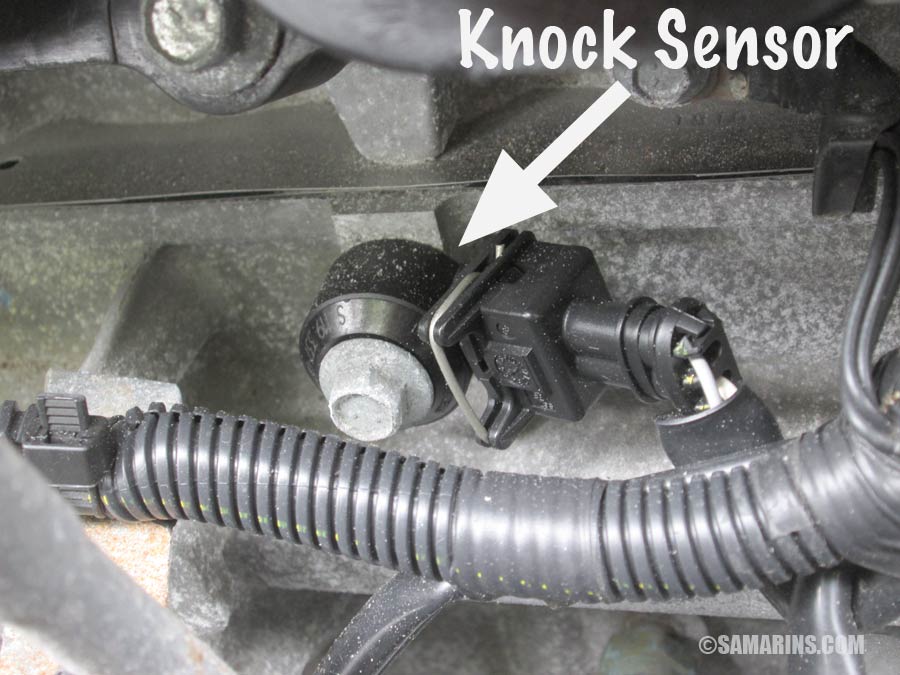
Disconnect the knock sensor connector and look for corrosion, moisture, damaged seals, loose terminals, pushed-back pins, or broken locking tabs. Repair the connector when the service procedure allows it.
Step 2: Check the wiring
Follow the harness from the sensor toward the control module. Look for rubbed insulation, melted sections, stretched wires, broken conductors, or previous repairs that have failed.
Step 3: Check circuit continuity
With the ignition off and the appropriate connectors disconnected, use the manufacturer’s wiring diagram and DVOM procedure to check continuity and unwanted shorts.
Step 4: Inspect the sensor mounting
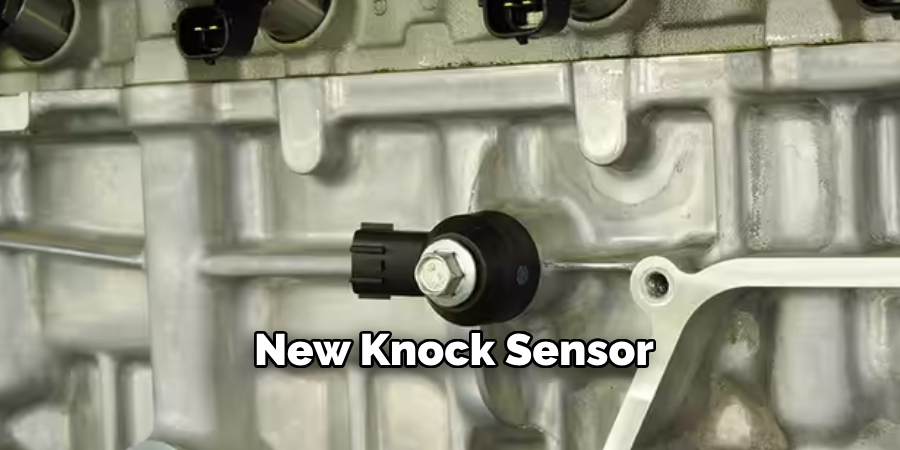
Make sure the sensor is installed in the correct location and according to the manufacturer’s procedure. Check for looseness, contamination, incorrect hardware, or installation damage.
Step 5: Check electrical specifications
Measure resistance, voltage, or signal output only according to the vehicle-specific service procedure. Do not use a generic value as proof that a sensor is good or bad.
Step 6: Correct the underlying engine condition
If the engine is genuinely knocking, investigate fuel quality, ignition, air-fuel mixture, overheating, fuel delivery, carbon deposits, and mechanical problems as appropriate for the vehicle.
Step 7: Clear and retest
After repairing the confirmed fault, clear the code if appropriate and complete the manufacturer’s required drive cycle or diagnostic test. A returning code means further diagnosis is needed.
Cleaning a Knock Sensor Connector
If inspection finds light contamination or oxidation at the electrical connector, an electronics-safe contact cleaner may help restore a reliable connection when the connector manufacturer permits its use. Disconnect the connector before cleaning and allow it to dry fully.
Do not scrape delicate terminals aggressively or flood the connector with an unsuitable solvent. If a terminal is loose, badly corroded, or no longer grips its mating terminal, cleaning alone will not restore the correct electrical connection. The terminal or connector may need repair.
Use the correct cleaner
Choose a cleaner intended for electrical contacts and compatible with automotive connector materials.
Inspect after cleaning
Check that terminals remain properly aligned and that the connector locks securely.
Repair damaged terminals
A loose or severely corroded terminal generally requires terminal repair or connector replacement rather than repeated cleaning.
Repairing Knock Sensor Wiring
Wiring is one of the main areas to inspect when you want to fix a knock sensor without replacing it. A conductor can break inside its insulation even when the outside looks acceptable. Carefully check areas exposed to heat, vibration, oil, coolant, and contact with brackets or engine components.
Use the vehicle wiring diagram to identify the correct sensor terminals and control-module connections. If a wire is damaged, use a repair method and connector components approved for the vehicle. After the repair, verify continuity and make sure the harness is routed away from sources of electrical interference or excessive heat.
Look for hidden breaks
Gently inspect suspect sections for stiffness, stretching, previous splices, or insulation damage.
Check for shorts
Use the service-manual procedure to check whether the signal circuit is unintentionally connected to ground or another circuit.
Secure the harness
Restore clips and routing so the repaired wire does not rub against the engine or exhaust.
Check for Engine Knock Before Blaming the Sensor
A knock sensor problem and actual engine knock are not the same thing. The sensor detects vibration associated with abnormal combustion, but the sensor cannot determine the complete mechanical cause of every unusual engine noise. If the engine is genuinely knocking or pinging, repair the underlying condition instead of trying to silence the warning by resetting the code.
For U.S. drivers, use the fuel grade specified in the owner’s manual. Using a fuel grade below the manufacturer’s requirement can contribute to knock on engines that require higher octane fuel. Other possible causes include ignition problems, fuel-system problems, excessive engine temperature, carbon buildup, or mechanical faults.
If you hear persistent metallic pinging, knocking, or other unusual engine sounds under load, avoid heavy acceleration until the cause is identified. Continued abnormal combustion can cause engine damage.
Source: ricksfreeautorepairadvice.com
Verify fuel requirements
Check the owner’s manual for the minimum octane rating specified for your exact engine.
Check engine temperature
An overheating or improperly controlled engine can create conditions that promote abnormal combustion.
Investigate ignition and fuel issues
Misfire, incorrect ignition operation, fuel delivery problems, or mixture issues can create drivability symptoms that overlap with sensor faults.
Do not ignore mechanical noise
A true engine knock may indicate a problem that cannot be fixed by cleaning or resetting a knock sensor.
When a Reset Is Not a Repair
Clearing a diagnostic trouble code only removes the stored fault information. It does not repair damaged wiring, a defective sensor, or an engine problem. If the condition remains, the control module can detect it again.
Disconnecting the battery can also erase learned settings or readiness information on some vehicles. It should not be used as a substitute for diagnosis, particularly when emissions testing or inspection readiness matters.
Code returns
A recurring code indicates that the monitored condition may still exist or that another related problem has not been resolved.
Readiness resets
Clearing codes can reset emissions monitors, which may matter for vehicle inspection requirements.
How to Test the Knock Sensor Before Replacing It
Testing can determine whether the problem is more likely to be the sensor or its circuit, but the exact procedure varies by vehicle. Some systems use different sensor designs, reference circuits, signal strategies, and diagnostic methods. Always obtain the wiring diagram and specifications for the exact vehicle.
A digital multimeter can be useful for resistance and circuit checks when the manufacturer provides a test procedure. Do not assume that every knock sensor should show the same resistance. A resistance value that is normal on one vehicle may be incorrect on another.
Some diagnostic procedures also use scan-tool data to observe knock-related parameters while the engine operates. Follow the manufacturer’s instructions rather than intentionally creating severe engine knock. Deliberately causing damaging detonation is not an appropriate general-purpose test.
Source: autovehicleparts.com
Compare resistance with factory specifications
If the manufacturer provides a resistance test, compare the measured result with that exact specification and test condition.
Check connector-side voltage when specified
Some systems use a defined reference or bias voltage. Verify it using the manufacturer’s procedure rather than assuming a universal voltage.
Check continuity to the control module
A good sensor cannot communicate correctly if the circuit between the sensor and control module is open or shorted.
Check signal behavior
Where supported by the service procedure, scan-tool or oscilloscope testing can help confirm whether the sensor produces the expected signal.
When Testing Shows the Sensor Is Bad
If the connector and wiring pass inspection but the sensor fails the manufacturer’s resistance, signal, or functional test, replacing the sensor is generally the appropriate repair. Cleaning cannot restore a damaged piezoelectric sensing element.
Before installing another sensor, confirm that the mounting surface, torque procedure, connector, wiring, and surrounding engine condition are correct. Otherwise, the replacement sensor may develop the same fault or the original diagnostic problem may remain.
Failed electrical specification
A sensor that is outside the manufacturer’s specified electrical range may require replacement.
Failed functional test
If the sensor cannot produce the expected signal after the circuit has been verified, replacement is usually necessary.
Physical damage
Cracks, damaged terminals, severe corrosion, or other physical defects can make replacement necessary.
Common Mistakes When Trying to Fix a Knock Sensor
The biggest mistake is replacing the sensor before confirming that the sensor has failed. A wiring problem can produce the same diagnostic code and will remain after a new sensor is installed.
Another mistake is using a universal resistance or voltage value. Knock sensor circuits are not identical across all vehicles. A correct diagnosis requires the exact engine, wiring diagram, connector pinout, and manufacturer specifications.
Avoid tightening or loosening a sensor by guesswork. Mounting torque and installation details can affect sensor operation. Follow the service procedure for the specific vehicle.
Source: samarins.com
Replacing parts from the code alone
A DTC identifies a monitored fault area but does not always identify the failed physical component.
Using random test values
Generic resistance and voltage numbers can lead to incorrect conclusions.
Ignoring wiring
Damaged harnesses, poor terminals, corrosion, and shorts can prevent a good sensor from working.
Forcing a connector
Bent or pushed-back terminals can become worse if a connector is forced together.
Driving with obvious engine knock
A persistent knocking or pinging condition should be diagnosed rather than hidden by repeatedly clearing the warning.
When to Stop DIY Diagnosis
Professional diagnosis is appropriate when the sensor is buried beneath an intake manifold, requires access to difficult engine components, involves coolant passages, or requires specialized scan-tool or oscilloscope testing. It is also appropriate when the engine has persistent knock, severe loss of power, overheating, or other symptoms that could indicate internal damage.
If you are not comfortable testing automotive electrical circuits, do not probe unknown terminals or apply external voltage to the sensor. Incorrect testing can damage the sensor, wiring, or control module.
Persistent engine knock
Have the vehicle diagnosed before continued heavy driving.
Complex access
Use professional service when reaching the sensor requires substantial disassembly or creates a risk of damaging other components.
Unclear electrical readings
If measured values do not make sense, stop and verify the wiring diagram and test procedure instead of guessing.
Frequently Asked Questions
Q
Can I clean a knock sensor instead of replacing it?
You may be able to clean contamination from the electrical connector when the connector is the problem, but cleaning normally cannot repair a failed sensing element. Inspect the connector and sensor mounting area first, and use only cleaning methods approved for the vehicle’s components.
Q
Can a bad knock sensor be caused by wiring?
Yes. Open circuits, short circuits, damaged insulation, corroded terminals, loose connectors, and poor connections can all create knock sensor-related trouble codes. This is why the wiring should be inspected and tested before replacing a sensor.
Q
Will disconnecting the battery fix a knock sensor code?
Disconnecting the battery may clear stored diagnostic information on some vehicles, but it does not repair the underlying fault. It can also reset emissions readiness monitors and other learned settings, so it should not be treated as a repair.
Q
How do I know if the knock sensor itself is bad?
The most reliable method is to follow the manufacturer’s diagnostic procedure for the exact vehicle. If wiring, connectors, power or reference circuits, and mounting conditions are correct but the sensor fails the specified resistance, signal, or functional test, the sensor is more likely to require replacement.
Q
Can low-octane fuel cause a knock sensor code?
Using fuel below the octane requirement specified for the engine can contribute to abnormal combustion in some vehicles. If a vehicle has actual pinging or knocking, verify the required fuel grade and investigate the underlying engine condition instead of assuming the sensor is defective.
Q
Can I drive with a knock sensor code?
A vehicle with a knock sensor code may continue to run, but the risk depends on the actual cause and the vehicle’s control strategy. If you hear persistent engine knock, experience major power loss, overheating, or severe drivability problems, avoid continued hard driving and have the vehicle diagnosed.
Q
Do I need to replace the knock sensor if the code comes back after clearing it?
Not automatically. A returning code means the monitored condition has likely returned or another related problem remains. Recheck the wiring, connector, mounting, electrical specifications, and underlying engine condition before concluding that the sensor itself has failed.
✦ Wrapping Up
Conclusion
Learning how to fix a knock sensor without replacing it starts with diagnosis, not parts replacement. Inspect the connector and wiring, check for corrosion or damaged terminals, verify the mounting condition, and perform only the electrical tests specified for the exact vehicle. Also investigate genuine engine knock and fuel or engine-management problems that can affect the system.
If the circuit and mounting are correct but the sensor fails its manufacturer-specified test, replacement may be unavoidable. The goal is not simply to remove the check engine light. The correct repair is the one that restores the knock-control system and addresses the condition that caused the fault.
💡 Key Takeaway
Before buying a replacement knock sensor, record the exact DTC, inspect the connector and wiring, verify the sensor mounting, and compare test results with the vehicle manufacturer’s specifications. If the sensor passes those checks, investigate the engine condition instead of replacing a working component.
Ethan Brooks is an automotive writer at Auto News 7, covering car news, vehicle maintenance, new model updates, recalls, and practical buying guides. He focuses on clear, useful information that helps drivers understand their vehicles and make better ownership decisions.
Learn how long to replace camshaft position sensor components, what affects repair time, labor costs, common symptoms, and whether you can do the job yourself.
Learn how to test a BMW camshaft position sensor using a scan tool, multimeter, and practical troubleshooting steps. Diagnose faults, symptoms, and sensor failures accurately.
Learn how to clean camshaft position sensor components safely with a simple step-by-step process, tools list, troubleshooting tips, and common mistakes to avoid.
Does crankshaft sensor affect RPM? Learn how the crankshaft position sensor controls engine speed data, why RPM can drop or fluctuate, and how to diagnose faults.