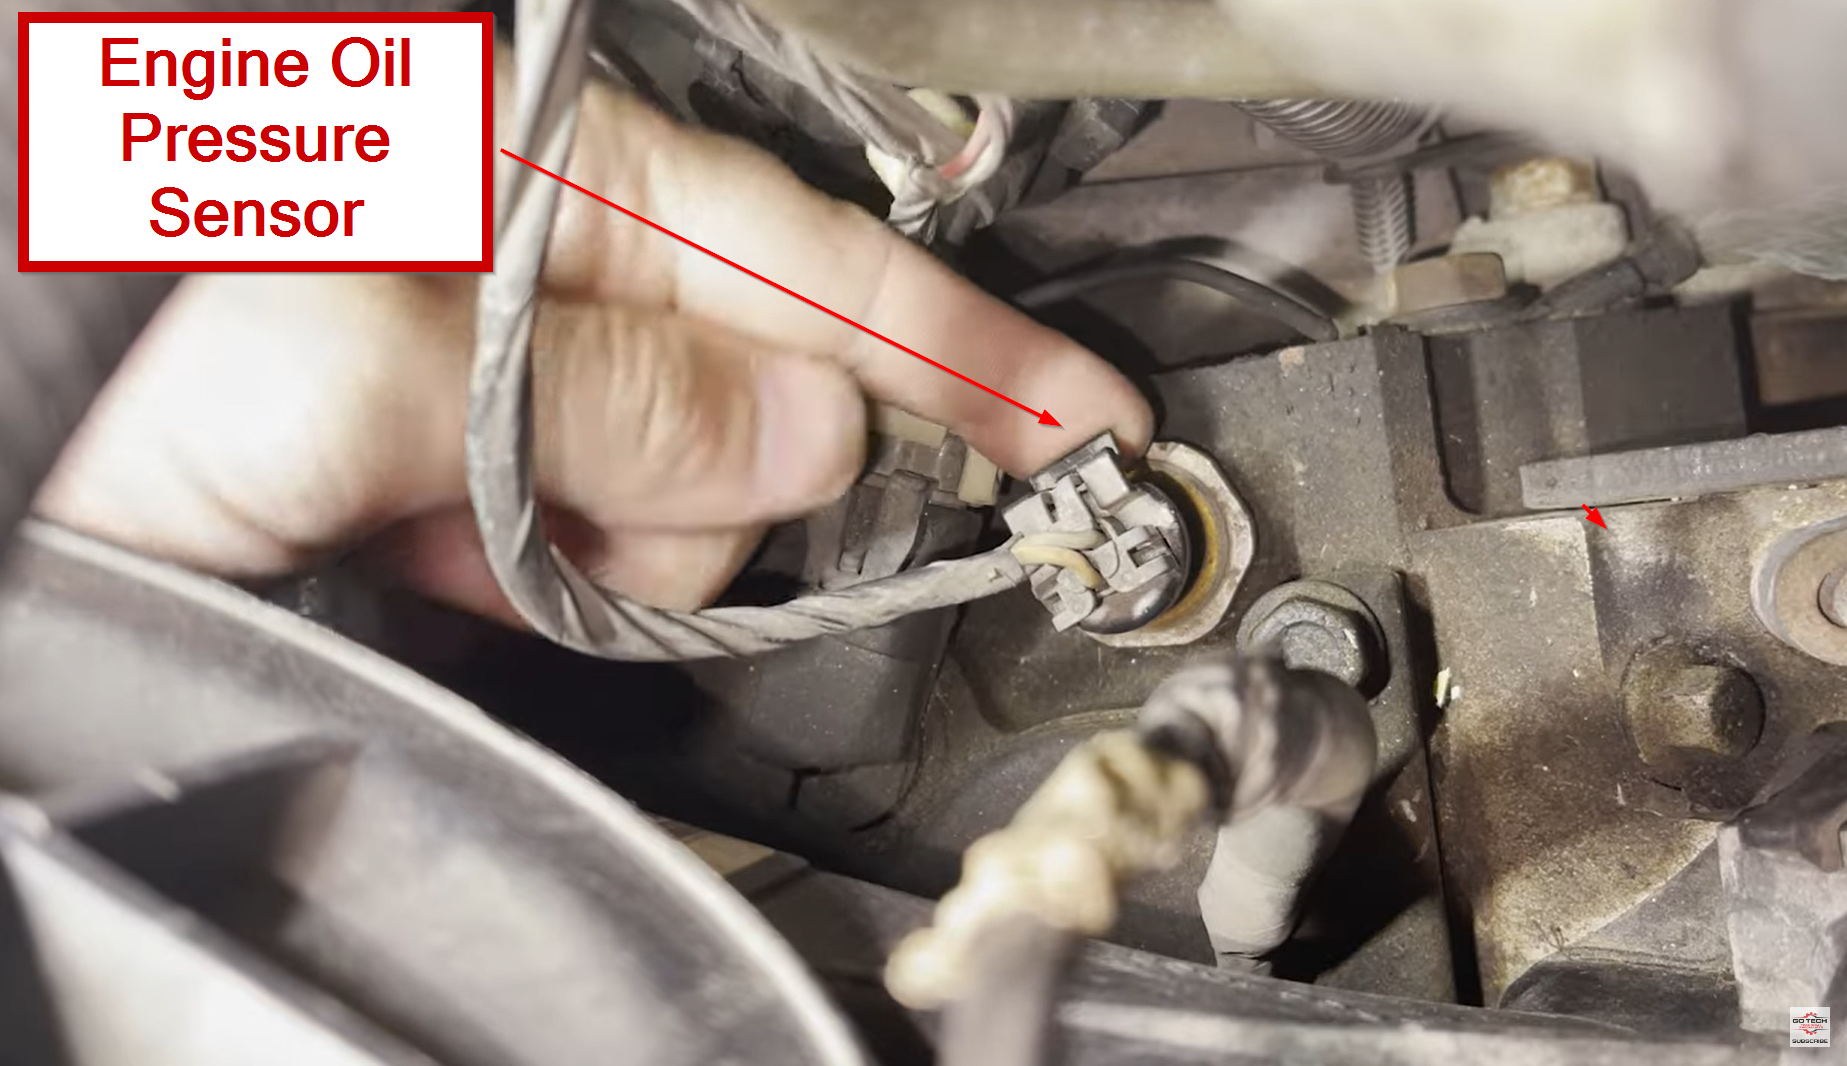
To remove an oil pressure sensor connector, release its locking mechanism, then pull the connector straight off without pulling the wires.
For drivers and DIY mechanics in the United States, learning how to remove oil pressure sensor connector is useful when replacing a faulty sensor, checking wiring, or diagnosing an oil pressure warning. The exact connector design varies by vehicle, so the safest method is to identify the lock before applying force.
Most oil pressure sensor connectors use a push tab, squeeze tab, or secondary locking clip. Work only on a cool engine, keep the connector and sensor area clean, and avoid twisting the wires. If the connector will not release with light pressure, stop and identify the locking mechanism rather than forcing it.
Source: thecarhow.com
What Is an Oil Pressure Sensor Connector?
The oil pressure sensor connector is the electrical plug that connects the engine oil pressure sensor or switch to the vehicle wiring harness. The sensor monitors oil pressure and sends an electrical signal to the vehicle’s gauge, warning system, engine computer, or another control module, depending on the vehicle.
The connector normally has a plastic housing, electrical terminals, and a locking mechanism. The lock prevents vibration from separating the plug while the engine is running. Because several connector designs are used across cars and trucks sold in the United States, the release method depends on the specific vehicle.
The connector is different from the oil pressure sensor itself. Removing the connector only separates the electrical connection. Removing the sensor requires additional steps and may allow engine oil to escape from the sensor opening.
Source: pinnaxis.com
Connector
The removable electrical plug attached to the sensor.
Locking tab
The plastic release feature that keeps the connector attached during normal vehicle operation.
Sensor
The threaded or mounted component that detects or switches according to engine oil pressure.
What You Need Before Removing the Connector
The job usually requires only basic access and a suitable tool for the connector lock. The most important preparation is creating enough room to see and operate the release mechanism without putting stress on the wiring harness.
Park the vehicle on a stable surface, switch the ignition off, and let the engine cool enough to work safely around the engine compartment. If your vehicle manufacturer’s service information specifies a battery-disconnection procedure for the repair, follow that procedure before handling the electrical connector.
Do not begin by pulling on the connector. First determine whether the plug uses a squeeze tab, push tab, slide lock, or another secondary lock.
Source: thecarhow.com
Basic supplies
Have a flashlight, clean shop towel, and suitable small trim or connector tool available if needed.
Optional tool
A small plastic pick or appropriate connector-release tool can help operate an inaccessible latch without damaging the housing.
Service information
Use the vehicle-specific repair manual when the connector design or access procedure is unclear.
Clean work area
Remove loose dirt around the connector before disconnecting it so debris does not enter exposed electrical connections.
How to Remove Oil Pressure Sensor Connector
The general removal process is simple: expose the connector, identify its lock, release the lock, and pull the connector housing straight away from the sensor. Do not use force until you are certain the locking mechanism has been released.
Connector designs differ between manufacturers and model years. A method that works on one vehicle may damage another connector, so use the following steps as a general procedure rather than a vehicle-specific service instruction.
Source: storage.googleapis.com
Step 1: Locate the sensor
Find the oil pressure sensor and identify the electrical connector attached to it. The sensor may be mounted on the engine block, cylinder head, oil filter housing, or another oil passage location.
Step 2: Create access
Move only the components permitted by the vehicle service procedure if they obstruct the connector. Avoid disturbing nearby hoses, wiring, or hot components unnecessarily.
Step 3: Inspect the lock
Look for a raised release tab, squeeze points, or a colored secondary lock. Determine which part must move before the connector can be released.
Step 4: Relieve connector tension
If the plug is difficult to release, gently push the connector toward the sensor before operating the lock. This can reduce pressure on the retaining feature.
Step 5: Release the lock
Press, squeeze, lift, or slide the locking mechanism according to its design. Use only light, controlled pressure.
Step 6: Pull the housing
Once the lock is released, hold the plastic connector body and pull it straight away from the sensor. A small side-to-side movement may help if the connector seal is tight, but do not twist aggressively.
Step 7: Inspect the connection
Check the terminals, plastic housing, sensor pins, and wiring for corrosion, oil contamination, bent terminals, cracked plastic, or damaged wires.
If the Connector Has a Push Tab
A push-tab connector normally has a flexible plastic tab that must be depressed while the connector is pulled away from the sensor. Press the tab firmly enough to release the latch, but do not bend it farther than necessary.
If the tab does not move, push the connector slightly toward the sensor first. Dirt or tension on the latch can make the release feel stuck.
Press the tab
Depress the designated release area on the connector housing.
Pull the housing
Keep the tab released while pulling the connector body straight away from the sensor.
If the Connector Has a Secondary Lock
Some connectors use a secondary locking clip or slider that prevents the primary release tab from moving. The secondary lock may be colored differently from the main connector housing.
Move the secondary lock only in the direction intended by the connector design. It may slide or lift to an unlocked position rather than coming completely out of the connector.
Find the secondary lock
Look for a separate plastic slider, clip, or locking piece on the connector.
Unlock it
Move the secondary lock to its release position before operating the main tab.
Release the connector
Press the primary tab and pull the connector housing away from the sensor.
How to Remove a Stuck Oil Pressure Sensor Connector
A stuck connector should be treated as a locking-mechanism problem until proven otherwise. Old connectors can become difficult to operate because of heat exposure, dirt, corrosion, hardened seals, or brittle plastic.
Start by pushing the connector slightly inward toward the sensor. Then operate the release tab while applying gentle outward pressure to the connector housing. This technique can remove tension from the latch without forcing the plastic.
If access is poor, a small plastic pick or appropriate connector tool may help operate the release. Avoid inserting a sharp metal tool deeply into the electrical terminals because it can damage the connector or create an electrical problem.
Source: sellaband.com
Clean the outside first
Remove loose dirt around the connector so contamination does not interfere with the latch or enter the connection.
Push before pulling
A slight inward push can relieve pressure on a retaining tab that is under tension.
Use controlled tool pressure
If a tool is necessary, apply only enough force to operate the release mechanism.
Stop if plastic begins to crack
A brittle connector may require connector replacement or professional repair rather than additional force.
What Not to Do With a Stuck Connector
Do not yank the wires, twist the harness, pry against the sensor body, or crush the connector with pliers. These actions can damage terminals or wiring and may turn a simple sensor replacement into an electrical repair.
Do not assume every colored clip should be completely removed. Some secondary locks are designed to move only to an unlocked position.
Do not pull the wires
Electrical conductors can stretch, break, or separate from their terminals.
Do not force the tab
Excessive force can snap aged plastic and permanently damage the connector.
Do not pry against fragile components
Avoid using the sensor, nearby wiring, or engine components as a leverage point.
Inspect the Oil Pressure Sensor Connector After Removal
Once the oil pressure sensor connector is disconnected, inspect it before installing a replacement sensor or reconnecting the original component. A damaged connector can cause electrical symptoms that look like a failed oil pressure sensor.
Look at the metal terminals inside the connector and compare their position and condition. Terminals should not be badly corroded, pushed backward, bent, loose, or contaminated with oil. Also inspect the wire insulation near the connector for cuts, stretching, or broken strands.
Oil or moisture inside the connector deserves attention. Determine whether contamination came from an external leak or from a sensor that may be leaking internally. Cleaning the connector alone will not correct a damaged terminal, broken wire, or defective sensor.
Source: namibian.com.na
Check the terminals
Look for corrosion, bent contacts, loose terminals, or terminals that have moved backward into the housing.
Check the housing
Look for cracked locking tabs, broken guides, melted plastic, or other damage that could prevent a secure connection.
Check the wiring
Inspect the first section of wiring behind the connector for cuts, stretched insulation, or damage caused by pulling.
Check for contamination
Inspect for oil, water, dirt, or corrosion that could interfere with electrical contact.
Signs the Connector May Need Repair
A connector may need repair or replacement if its locking tab is broken, the terminals are loose, or the connector cannot hold the sensor securely. Do not rely on an electrical connection that can separate with light movement.
If the wiring is damaged close to the connector, use the vehicle manufacturer’s wiring repair procedure or have the circuit repaired by a qualified technician. Correct terminal type, wire size, sealing, and crimping matter for a reliable repair.
Broken lock
The connector no longer stays securely attached to the sensor.
Damaged terminal
A terminal is bent, corroded, loose, or pushed out of position.
Damaged wire
The conductor or insulation shows evidence of stretching, cutting, corrosion, or heat damage.
How to Reconnect the Oil Pressure Sensor Connector
Reconnect the oil pressure sensor connector only after confirming that the terminals and locking mechanism are in good condition. Align the connector carefully with the sensor and push it straight into place.
A properly seated connector should engage its locking mechanism. Depending on the design, you may hear or feel a click, or you may be able to confirm visually that the lock has returned to its secured position.
Do not force the connector if it does not seat. Misalignment can damage terminals. Pull it back off, inspect the connector and sensor, then realign them before trying again.
Source: cbgbfest.com
Align
Match the connector guides with the sensor connection before applying pressure.
Push straight
Seat the connector without twisting or bending the harness.
Confirm the lock
Make sure the primary and secondary locking features are fully engaged.
Verify the wiring
Ensure the harness is routed as designed and is not stretched against nearby components.
Common Mistakes When Removing an Oil Pressure Sensor Connector
Most connector damage happens when the release mechanism is overlooked or excessive force is used. Taking a few seconds to inspect the connector can prevent broken tabs and damaged wiring.
Another common mistake is confusing connector removal with sensor removal. The connector can be disconnected without removing the threaded sensor. If you are only diagnosing an electrical issue, there may be no reason to remove the sensor from the engine.
Source: toolsweek.com
Pulling on the wires
This can damage the conductor or pull terminals out of the connector housing.
Ignoring a secondary lock
A secondary lock can prevent the main release tab from operating until it is moved to the unlocked position.
Using excessive force
Force can break heat-aged plastic and turn a simple disconnection into a connector repair.
Working around a hot engine
The sensor and surrounding engine components can become hot enough to cause burns.
Assuming the sensor is faulty
A warning light or incorrect reading can also result from wiring, connector, circuit, or actual oil-pressure problems.
When You Should Stop and Get Professional Help
Stop the repair if the connector will not release without significant force, the wiring is damaged, the terminals are badly corroded, or the connector breaks. A professional technician can identify the connector design and perform a proper wiring or terminal repair.
Professional diagnosis is especially appropriate when an oil pressure warning remains active after the connector or sensor has been serviced. An oil pressure warning can indicate a real lubrication problem, and replacing the sensor without checking actual oil pressure can miss a serious engine fault.
Persistent oil pressure warning
Do not assume the warning is only an electrical problem.
Severe connector damage
A broken housing or damaged terminals may require specialized wiring repair.
Unknown connector design
Use vehicle-specific service information rather than guessing how the lock operates.
Frequently Asked Questions
Q
How do I remove an oil pressure sensor connector without breaking it?
Identify the connector’s locking mechanism before pulling it. Release the tab, squeeze point, or secondary lock, then pull the plastic connector housing straight away from the sensor while avoiding the wires.
If it is stuck, push the connector slightly toward the sensor while operating the release. This can reduce pressure on the latch and make removal easier.
Q
Do I need to remove the battery to disconnect an oil pressure sensor connector?
The required procedure depends on the vehicle and the repair being performed. Follow the vehicle manufacturer’s service information when it specifies battery disconnection before electrical work.
At minimum, switch the ignition off before disconnecting the connector. Do not probe or short electrical terminals unnecessarily.
Q
Why will my oil pressure sensor connector not come off?
The most common reasons include an unreleased locking tab, a secondary lock that has not been moved, dirt around the latch, tension on the connector, or brittle plastic caused by age and heat.
Push the connector gently toward the sensor, identify the exact locking feature, and release it before pulling. If the plastic begins to flex excessively or crack, stop rather than applying more force.
Q
Can I pull the oil pressure sensor connector by its wires?
No. Pulling the wires can stretch or break the conductors and may pull terminals out of the connector housing.
Always hold the plastic connector body when disconnecting it. If access is difficult, improve access or use an appropriate connector-release tool instead of pulling the harness.
Q
What should I check after removing the oil pressure sensor connector?
Inspect the connector housing, locking tab, electrical terminals, sensor pins, and nearby wiring. Look for corrosion, oil contamination, bent or recessed terminals, cracked plastic, and damaged insulation.
If any of these problems are present, correct the underlying electrical or mechanical issue before assuming that replacing the oil pressure sensor will solve the problem.
Q
Can a bad oil pressure sensor connector cause an oil pressure warning?
Yes. A damaged connector, poor terminal contact, broken wire, or contaminated connection can interfere with the sensor signal and contribute to an incorrect warning or reading.
However, an oil pressure warning can also indicate genuinely low engine oil pressure. If the warning remains after electrical connections are checked, follow the vehicle-specific diagnostic procedure and verify actual oil pressure when required.
✦ Wrapping Up
Conclusion
Learning how to remove oil pressure sensor connector starts with identifying the connector’s locking mechanism rather than pulling on the plug. Most connectors can be released with controlled pressure on a push tab, squeeze mechanism, or secondary lock, followed by a straight pull on the connector housing.
After removal, inspect the terminals, housing, and wiring before reconnecting or replacing the sensor. If the connector is damaged or the oil pressure warning remains after the electrical connection is serviced, use vehicle-specific diagnostic information or seek qualified professional assistance.
💡 Key Takeaway
Release the connector lock first, pull only on the plastic housing, inspect the electrical connection carefully, and stop if the connector requires excessive force.
Ethan Brooks is an automotive writer at Auto News 7, covering car news, vehicle maintenance, new model updates, recalls, and practical buying guides. He focuses on clear, useful information that helps drivers understand their vehicles and make better ownership decisions.
Learn what causes a knock sensor to go bad, the most common failure reasons, warning signs, diagnostic tips, and how to prevent expensive engine problems.
Learn what the camshaft sensor controls, how it works with the engine computer, common failure symptoms, and why it is essential for fuel injection, ignition timing, and engine performance.
Learn whether a bad knock sensor can damage the engine, how it affects performance, warning signs to watch for, and when repairs are necessary to prevent costly engine problems.
Learn whether a knock sensor affects acceleration, how a faulty knock sensor impacts engine performance, common symptoms, diagnostic steps, and when replacement is necessary.