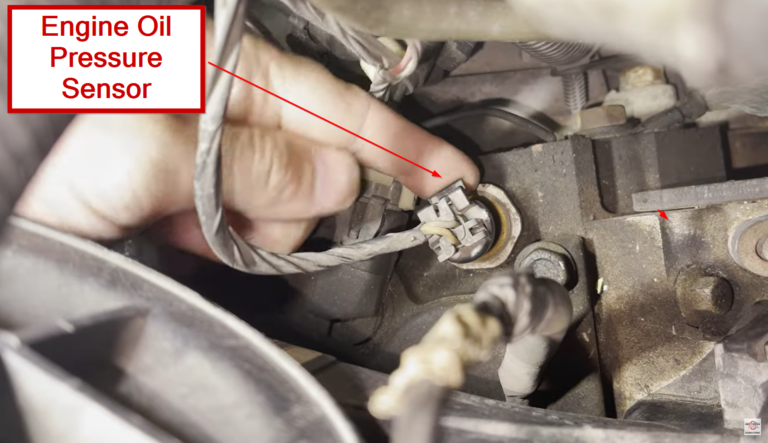
To remove an oil pressure sensor, disconnect its electrical connector, use the correct sensor socket or wrench, and carefully unscrew the sensor from the engine.
For drivers and DIY mechanics in the United States, learning how to remove oil pressure sensor components can make a routine engine repair easier, but the exact procedure varies by vehicle. The sensor may sit near the oil filter, oil filter housing, cylinder head, or another oil passage, and some vehicles use an oil pressure switch instead of a variable pressure sensor.
Before removing the part, verify that the sensor is actually the problem. A low oil level, damaged wiring, a poor electrical connection, or genuinely low engine oil pressure can produce similar warning symptoms. If the oil pressure warning light is on, check the oil level and investigate actual oil pressure before assuming the sensor has failed.
Source: thecarhow.com
What You Need Before Removing an Oil Pressure Sensor
The exact tools depend on the vehicle, but most oil pressure sensor removals require basic hand tools plus a socket designed to fit the sensor. Check the owner’s manual or vehicle-specific service information for the correct sensor location, thread type, removal method, and tightening specification.
Work on a stable, level surface whenever possible. If access requires raising the vehicle, use properly rated jack stands on suitable support points. Never rely on a floor jack alone while working underneath a vehicle.
Source: m.media-amazon.com
Basic hand tools
Have a ratchet, suitable extension, and the correct socket or wrench available. Some sensors require a deep or slotted oil pressure switch socket because of their shape and electrical connector.
Drain pan
Place a drain pan beneath the sensor because a small amount of engine oil may escape when the sensor is removed.
Shop towels
Use clean towels to wipe oil from the connector area and protect nearby components from contamination.
Replacement sensor
If the old sensor is being replaced, compare the new part with the old one before installation. Check the connector, thread size, sealing arrangement, and overall shape.
Safety equipment
Wear eye protection and suitable gloves. Keep loose clothing, tools, and hands away from moving engine components.
Should the Engine Be Cold Before Removal?
A cool engine is generally the safest condition for this repair because the sensor and surrounding metal may become very hot during operation. If the vehicle has recently been driven, allow enough time for the engine and nearby components to cool before placing your hands around the sensor. Do not deliberately touch hot engine components to judge whether they are safe.
Avoid burns
The oil, engine block, exhaust components, and nearby hardware can remain hot after the engine is switched off.
Prevent contamination
A clean, cool work area makes it easier to keep dirt away from the electrical connector and threaded opening.
Locate the Oil Pressure Sensor
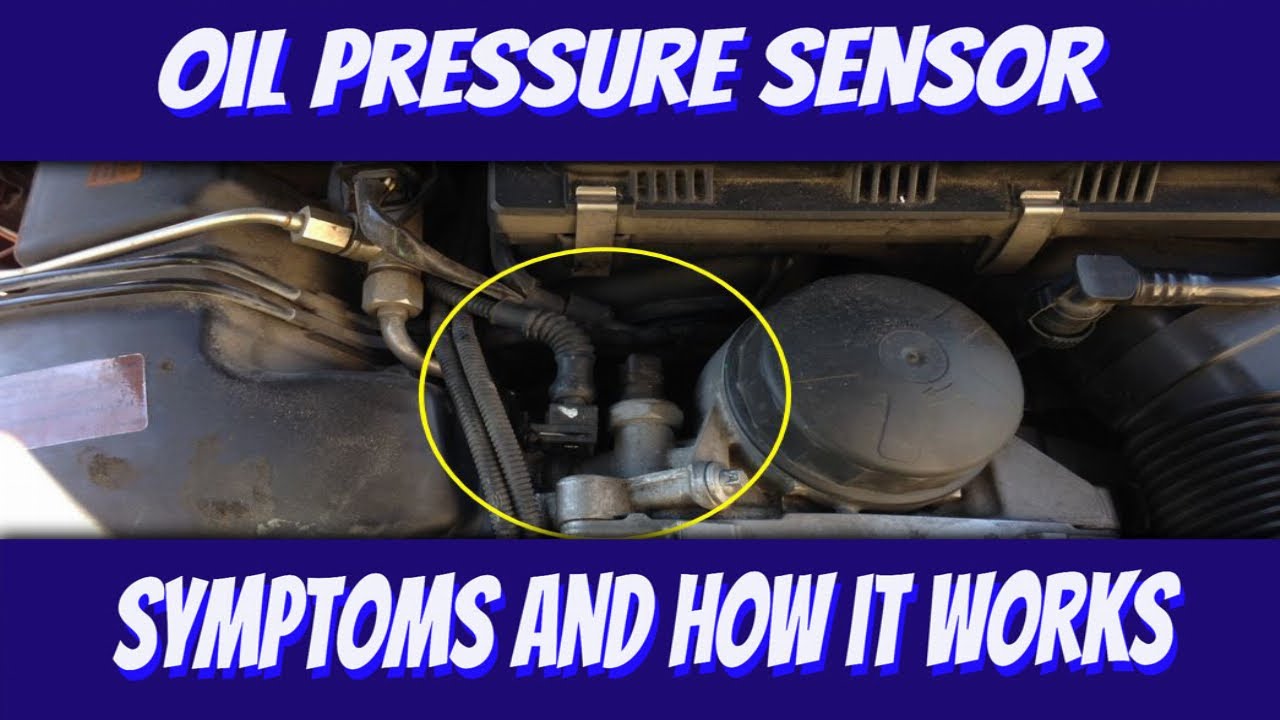
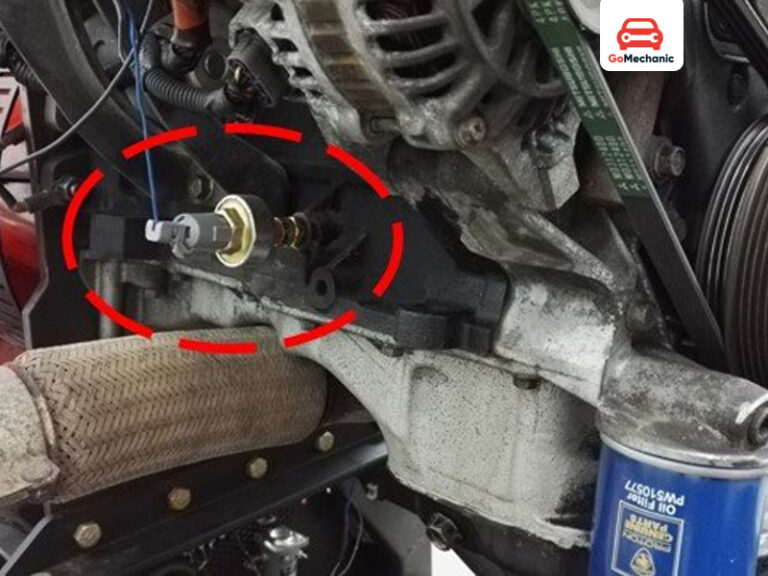
The oil pressure sensor is normally threaded into an engine oil passage, but its location varies widely by engine design. Common locations include the engine block near the oil filter, the oil filter housing, or the upper portion of the engine.
Do not identify the sensor only by appearance. Follow the wiring harness to the component and confirm its identity with vehicle-specific repair information. Some engines have multiple pressure-related sensors, so installing or removing the wrong component can create additional problems.
Source: i.ytimg.com
Near the oil filter
Many engines place the oil pressure switch or sensor close to the oil filter or filter housing for direct access to an engine oil passage.
On the engine block
Some sensors thread directly into a passage in the block and may be accessible from above or below the vehicle.
Vehicle-specific placement
The exact position can change with engine size, model year, drivetrain layout, and vehicle design, so confirm the location before removing anything.
How to Remove an Oil Pressure Sensor Step by Step
Once the vehicle is secure and the correct component is identified, removal is usually straightforward. The sensor is commonly held in place by threaded engagement with the engine, while an electrical connector carries the pressure signal to the vehicle’s gauge, instrument cluster, or engine control system.
Follow these steps in order. Do not force the sensor if it will not loosen normally, because damaged threads or a broken sensor can turn a simple repair into a larger job.
Source: i.ytimg.com
1. Secure the vehicle
Park on a stable surface, apply the parking brake, and use wheel chocks where appropriate. If you must raise the vehicle, support it with properly rated jack stands.
2. Disconnect electrical power when appropriate
Follow the vehicle service procedure for battery disconnection. On vehicles where disconnecting the negative battery terminal is specified or prudent, secure the cable so it cannot accidentally reconnect.
3. Identify and clean the sensor area
Remove loose dirt and oil around the sensor without pushing debris into the connector or threaded area.
4. Disconnect the electrical connector
Release the connector lock or tab and pull the connector from the sensor body. Do not yank the wire or twist the wiring harness.
5. Position a drain pan
Place a drain pan or suitable absorbent material below the sensor to catch oil that may leave the pressure port.
6. Fit the correct tool
Use the sensor-specific socket or correctly sized wrench on the sensor’s hex. Make sure the tool is fully seated before applying force.
7. Loosen the sensor
Turn the sensor counterclockwise while keeping the tool aligned with the sensor. Use controlled force rather than sudden excessive force.
8. Remove the sensor by hand
Once the threads are free, finish unscrewing the sensor by hand when possible. Keep the opening pointed toward the drain pan.
9. Inspect the opening
Check the engine’s threaded port and sealing surface for damaged threads, debris, cracks, or signs of previous sealant.
How to Disconnect the Electrical Connector
The electrical connector usually has a locking tab, clip, or secondary retainer. Release the locking mechanism before pulling the connector away from the sensor. If it is stuck, gently work the connector rather than pulling the wires.
After removal, inspect the connector for corrosion, oil contamination, damaged terminals, broken locking tabs, or loose wiring. A damaged connector can cause the same symptoms as a failed sensor and may need repair before a new sensor is installed.
Pull the connector body
Grip the plastic connector rather than the individual wires.
Release the lock first
Use the connector’s intended release tab or retainer. Avoid prying against delicate terminals unless the service procedure specifically permits it.
Inspect the terminals
Look for corrosion, bent contacts, damaged seals, or oil contamination before continuing.
What to Do If the Oil Pressure Sensor Is Stuck
A stuck oil pressure sensor should be treated as a seized threaded component, not as a part that can simply be forced loose. Corrosion, excessive installation torque, contamination, or long-term heat cycling can make removal difficult.
Start with controlled methods. Make sure the correct socket is fully seated and apply steady force. If the sensor begins to deform, the hex starts rounding, or the threaded fitting in the engine appears to move, stop before causing additional damage.
Source: evparts4x4.com
Use the correct socket
A dedicated oil pressure switch socket can provide better engagement than an incorrectly sized general-purpose socket.
Use penetrating fluid cautiously
If appropriate for the vehicle and accessible threaded area, a penetrating product may help with corrosion. Keep flammable products away from hot surfaces and ignition sources.
Avoid excessive force
Excessive force can round the sensor, break the component, or damage the engine’s threaded port.
Get professional help when necessary
If the sensor will not move without damaging the threads or surrounding component, professional removal may be safer than escalating force.
What If the Sensor Breaks During Removal?
If the sensor breaks and part of the threaded body remains in the engine, do not start drilling without confirming the correct extraction method. Metal debris entering an oil passage can create a separate problem, and damaged engine threads may require specialized repair.
A professional technician can determine whether the remaining section can be extracted with a suitable tool or whether the threaded port needs repair. The safest approach depends on the engine design and the location of the broken component.
Stop if the fitting moves
If the engine-side fitting or adapter appears to rotate with the sensor, stop and consult vehicle-specific service information.
Prevent debris
Keep broken metal and extraction debris out of the oil passage.
Inspect the threads
Before installing a replacement sensor, confirm that the engine-side threads are clean and undamaged.
Do You Need to Drain the Engine Oil First?
You do not always need to drain the engine oil before removing an oil pressure sensor. The sensor is installed above or within an oil passage, and the amount of oil that escapes depends on the sensor’s location and the engine design.
Draining the oil can reduce the mess on some vehicles, especially when the sensor is positioned low or close to the oil filter. However, the vehicle’s service procedure should determine whether draining the oil is required. If you drain the oil, use the correct oil specification and replace the drain plug sealing component when required.
Source: images.platforum.cloud
Sensor mounted high
A small amount of oil may escape when a sensor is located high on the engine, although the exact amount varies by engine.
Sensor mounted low
More oil may escape when the pressure port is positioned lower in the engine’s oil circuit.
During an oil change
If the sensor repair is being performed alongside an oil and filter change, coordinating the jobs may reduce cleanup and repeated work.
How to Tell Whether the Sensor Actually Needs Removal
An oil pressure warning does not automatically prove that the sensor has failed. The engine may have low oil pressure because of low oil level, an oiling-system problem, a clogged filter, an oil pump problem, or internal engine wear. Electrical faults can also create false warnings.
Check the oil level and inspect the sensor wiring before removing the part. If the vehicle’s warning system indicates low pressure and the engine has abnormal knocking, ticking, or other serious mechanical symptoms, shut the engine off and investigate the pressure problem rather than driving it to see whether the warning disappears.
Source: nissankaengine.com
Check engine oil level
Verify the level using the procedure in the owner’s manual. Correct a low oil level before continuing with diagnosis.
Inspect wiring
Look for broken wires, corrosion, oil contamination, loose connections, or damaged connector locks.
Check diagnostic trouble codes
A scan tool can identify engine control system codes associated with oil pressure sensor or switch circuits, but a code alone does not prove the sensor is defective.
Verify actual oil pressure
When low pressure is suspected, a mechanical oil pressure test can determine whether the engine is producing pressure within the manufacturer’s specified range.
Oil Pressure Sensor vs. Oil Pressure Switch
The terms sensor and switch are often used interchangeably, but they can describe different components. A pressure switch typically changes electrical state at a specified pressure threshold, while a pressure sensor can provide a variable signal representing oil pressure.
This difference matters when ordering a replacement. Match the replacement part to the vehicle’s specified component, connector, thread, and operating characteristics rather than choosing a part based only on appearance.
Pressure switch
Typically operates as an electrical switch around a specified pressure condition.
Pressure sensor
Can provide a variable pressure signal to the vehicle’s gauge or control module.
Correct replacement matters
A physically similar part may still have the wrong connector, thread, signal characteristics, or pressure range.
What to Inspect After Removing the Sensor
Removal is only half of the job. Before installing a replacement, inspect the old sensor and the engine-side opening. These checks can reveal whether the original problem may involve the connector, sealing surface, or threaded port rather than the sensor itself.
Compare the replacement part with the removed part before applying any sealant or tightening it. Use the manufacturer’s specified sealing method and torque value because thread sealant requirements vary by application.
Source: i.ytimg.com
Inspect the sensor threads
Check for damaged, cross-threaded, or heavily contaminated threads.
Inspect the engine port
Make sure the threaded opening is clean and free of damaged material or debris.
Check the sealing method
Some sensors use a sealing washer or designed sealing surface, while others may require a specified thread sealant. Follow vehicle-specific instructions rather than adding sealant automatically.
Inspect the connector
Confirm that the connector locks securely and that its terminals are clean and undamaged.
Common Mistakes When Removing an Oil Pressure Sensor
Most problems during oil pressure sensor removal come from using the wrong tool, pulling on the wiring, working around a hot engine, or applying too much force. Avoiding these mistakes protects both the sensor and the engine.
The most serious mistake is assuming that a warning light proves the sensor is bad. If actual oil pressure is low, replacing the sensor will not correct the underlying engine problem.
Source: i.ytimg.com
Using the wrong socket
An improperly fitting socket can damage the sensor’s hex and make removal more difficult.
Pulling on the wiring
The connector should be released from the sensor body. Pulling the harness can break wires or terminals.
Working on a hot engine
Hot engine components and oil can cause burns. Allow adequate cooling time before working in the sensor area.
Adding unapproved sealant
Sealant can interfere with electrical grounding or contaminate an oil passage on applications that do not call for it.
Skipping the oil pressure diagnosis
A faulty sensor and genuine low oil pressure can produce similar warnings. Verify the underlying condition when the symptoms indicate a possible lubrication-system problem.
Frequently Asked Questions
Q
Can I remove an oil pressure sensor without draining the oil?
Often, yes. The amount of oil that escapes depends on where the sensor is installed and the engine’s oil passages. Some applications require or benefit from draining the oil first, so follow the vehicle-specific service procedure and have a drain pan ready.
Q
What tool do I need to remove an oil pressure sensor?
The required tool varies by vehicle. Many applications use a dedicated oil pressure switch socket or a correctly sized deep socket or wrench. Check the sensor and vehicle service information before choosing the tool because an incorrect size can damage the sensor hex.
Q
Why will my oil pressure sensor not come out?
Corrosion, excessive installation torque, contamination, or heat cycling can cause the sensor to seize in its threaded port. Make sure the correct tool is fully seated and use controlled force. Stop if the sensor begins to round, break, or move an engine-side fitting.
Q
Should I disconnect the battery before removing an oil pressure sensor?
Follow the vehicle’s service procedure. Disconnecting the negative battery cable can reduce the risk of an accidental electrical short on some applications, but some vehicles have specific procedures for battery disconnection. Always account for vehicle systems that may require reset procedures afterward.
Q
How do I know if I have an oil pressure sensor or switch?
The terminology varies by vehicle. A switch generally changes electrical state at a pressure threshold, while a sensor can provide a variable signal. The safest way to identify the correct component is to use the vehicle’s year, make, model, engine, and service information.
Q
Can I drive after removing or replacing the oil pressure sensor?
Do not drive the vehicle until the sensor or replacement part is correctly installed, the electrical connector is secured, the area is checked for oil leaks, and the engine’s oil level is correct. If the original warning involved suspected low oil pressure, verify that the engine has safe oil pressure before normal driving.
✦ Wrapping Up
Conclusion
Learning how to remove oil pressure sensor components is usually a manageable repair when the sensor is accessible and the correct tools are used. The basic process is to identify the correct component, allow the engine to cool, disconnect the electrical connector, protect the work area from escaping oil, and carefully unscrew the sensor.
The removal itself is not the most important diagnostic step. If the sensor was removed because of an oil pressure warning, make sure the engine actually has adequate oil pressure before assuming the old sensor caused the problem. Damaged wiring, low oil level, or a mechanical lubrication-system fault can require a different repair.
💡 Key Takeaway
Before removing the sensor, confirm the correct component and service procedure for your exact vehicle, then use the correct socket, controlled force, and proper safety support throughout the repair.
Ethan Brooks is an automotive writer at Auto News 7, covering car news, vehicle maintenance, new model updates, recalls, and practical buying guides. He focuses on clear, useful information that helps drivers understand their vehicles and make better ownership decisions.
Learn whether a knock sensor is covered under a powertrain warranty, what factors affect coverage, common warranty exclusions, and how to verify your vehicle’s protection.
Learn how many camshaft sensors a car has, why the number varies by engine design, where they are located, and how to identify the correct sensor on your vehicle.
Learn what causes a knock sensor to go bad, the most common failure reasons, warning signs, diagnostic tips, and how to prevent expensive engine problems.