To install a knock sensor, locate the correct sensor, remove the old unit, install the replacement at the specified angle and torque, reconnect the wiring, and verify the repair.
If you are working on a car or truck in the United States, the exact knock sensor installation procedure depends on the year, make, model, engine, and sensor design. Some American-market vehicles place the sensor on the side of the engine block where it is easy to reach. Others place one or more sensors beneath the intake manifold, making the repair much more involved.
A knock sensor detects vibrations associated with abnormal combustion and sends a signal to the engine control module. The control system can use that information to adjust engine operation when knock occurs. Because the sensor depends on correct mechanical mounting and electrical connections, installation is not simply a matter of tightening a new part into place.
Before starting, identify the correct replacement sensor and obtain the service information for your exact vehicle. Do not use a generic torque value, installation angle, sealant, or testing procedure when the manufacturer specifies something different. A torque specification that is correct for one engine can be wrong for another.
Source: youtube.com
What Does a Knock Sensor Do?
A knock sensor monitors vibrations produced by the engine and provides information that helps the engine control system detect abnormal combustion. Many automotive knock sensors use a piezoelectric element that converts mechanical vibration into an electrical signal.
Engine knock, also called detonation or pinging, is different from an ordinary mechanical rattle. It involves abnormal combustion inside the cylinder and can create damaging pressure waves. The engine control module uses the knock sensor signal as part of its strategy for controlling ignition timing and protecting the engine.
A failed sensor does not always mean the engine itself is knocking. A check engine light, a stored knock sensor fault code, reduced performance, or poor fuel economy can have several possible causes. The sensor, connector, wiring, mounting, and the engine’s actual operating condition should all be considered before replacement.
Source: safetywish.com
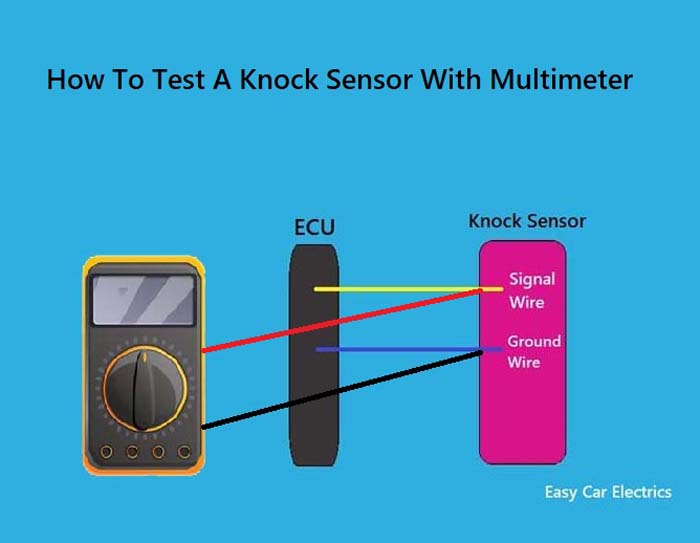
Sensor
The knock sensor detects vibration from the engine and produces an electrical signal.
Engine control module
The control module evaluates the sensor signal and can modify engine operation when knock is detected.
Mounting surface
The sensor needs the correct mechanical contact with the engine so it can detect the intended vibration.
Wiring and connector
The electrical circuit must remain intact and properly connected for the control module to receive the sensor signal.
Common Signs of a Knock Sensor Problem
A malfunctioning knock sensor can trigger the check engine light and store a diagnostic trouble code. Depending on the vehicle, the engine may also feel less responsive or operate with reduced performance because the control system changes its strategy when it cannot trust the knock signal.
These symptoms are not proof that the sensor itself has failed. Damaged wiring, corrosion, incorrect mounting, engine problems, or another electrical fault can create similar symptoms. Diagnosis should come before replacement whenever practical.
Warning light
The check engine light may illuminate when the control system detects a knock sensor circuit or signal problem.
Stored diagnostic code
Knock sensor-related trouble codes can point toward the circuit or sensor, but the code does not automatically identify the failed component.
Reduced performance
Some vehicles alter engine operation when a knock sensor fault is detected.
Poor fuel economy
Changes in engine control strategy can affect fuel consumption, although many other faults can produce the same symptom.
Check the Vehicle Before Installing the New Sensor
The safest way to begin is to identify the exact repair procedure for your vehicle. Look up the engine-specific service information and confirm the knock sensor location, replacement part, fastener type, tightening torque, installation angle, and any required sealant or gasket replacement.
Scan the vehicle for diagnostic trouble codes before disassembly if you have access to an OBD-II scanner. Record the codes and freeze-frame information when available. This creates a useful baseline and can help you determine whether the problem is still present after the repair.
Inspect the sensor connector and harness before removing the sensor. Look for broken insulation, stretched wires, oil contamination, corrosion, loose terminals, or wiring that has been damaged by heat. If the wiring is faulty, installing a new sensor alone may not solve the problem.
Source: gomechanic.in
Confirm the part
Match the replacement sensor to the vehicle application and engine rather than relying only on appearance.
Find the location
Determine whether the sensor is on the engine block, cylinder head, or beneath an intake assembly.
Record diagnostic codes
Save the existing codes before clearing anything so you can compare the post-repair result.
Inspect the circuit
Check the connector and harness for damage before assuming that the sensor is defective.
Tools and Supplies You May Need
The tools required vary considerably by vehicle. A simple installation may require only basic sockets and a torque wrench. A sensor buried beneath an intake manifold can require additional tools, replacement gaskets, coolant, hose clamps, or other supplies.
Use the service information for your vehicle to determine the exact requirements. Never assume that a universal tool list applies to every engine.
Basic hand tools
Sockets, ratchets, extensions, and suitable wrenches may be needed to reach the sensor and surrounding components.
Torque wrench
Use a suitable torque wrench to tighten the sensor fastener to the vehicle manufacturer’s specification.
Diagnostic scanner
An OBD-II scanner can read trouble codes and help verify whether the fault remains after installation.
Replacement gasket
If an intake manifold or another sealed component must be removed, use the replacement gasket specified by the service procedure.
How to Install a Knock Sensor Step by Step
Once you have confirmed the correct part and procedure, installation normally follows the same basic sequence. The exact disassembly can be very different from one engine to another, so treat the steps below as a general framework rather than a substitute for the vehicle-specific service manual.
Work on a cool engine unless the manufacturer’s procedure specifically requires another condition. Park the vehicle securely, set the parking brake, and keep loose clothing and tools away from moving engine components. If the procedure requires work near the fuel system, coolant system, or other hazardous components, follow the appropriate service precautions.
Source: ls1tech.com
1. Prepare the vehicle
Park securely, allow the engine to cool as required, and disconnect the battery when the vehicle-specific procedure calls for it.
2. Gain access to the sensor
Remove only the components necessary to reach the sensor, following the service sequence for the engine.
3. Disconnect the sensor
Release the electrical connector carefully and avoid pulling on the wires.
4. Remove the old sensor
Remove the retaining bolt, nut, or other fastener and take the old sensor away from the mounting surface.
5. Prepare the mounting area
Clean the specified contact area and remove contamination that could prevent correct sensor seating, while avoiding damage to the engine surface.
6. Install the replacement
Position the new sensor exactly as specified and start the fastener by hand to avoid cross-threading.
7. Tighten correctly
Use the vehicle-specific torque specification and installation angle. Do not substitute a generic torque value.
8. Reconnect the circuit
Connect the sensor firmly and route the harness so it cannot contact hot, sharp, or moving components.
9. Reassemble the vehicle
Reinstall removed components in the correct order and replace required gaskets, seals, clips, or fasteners.
10. Verify the repair
Check fluid levels and leaks where applicable, scan for codes, and follow the manufacturer’s post-repair inspection procedure.
Step 1: Gain Access to the Knock Sensor
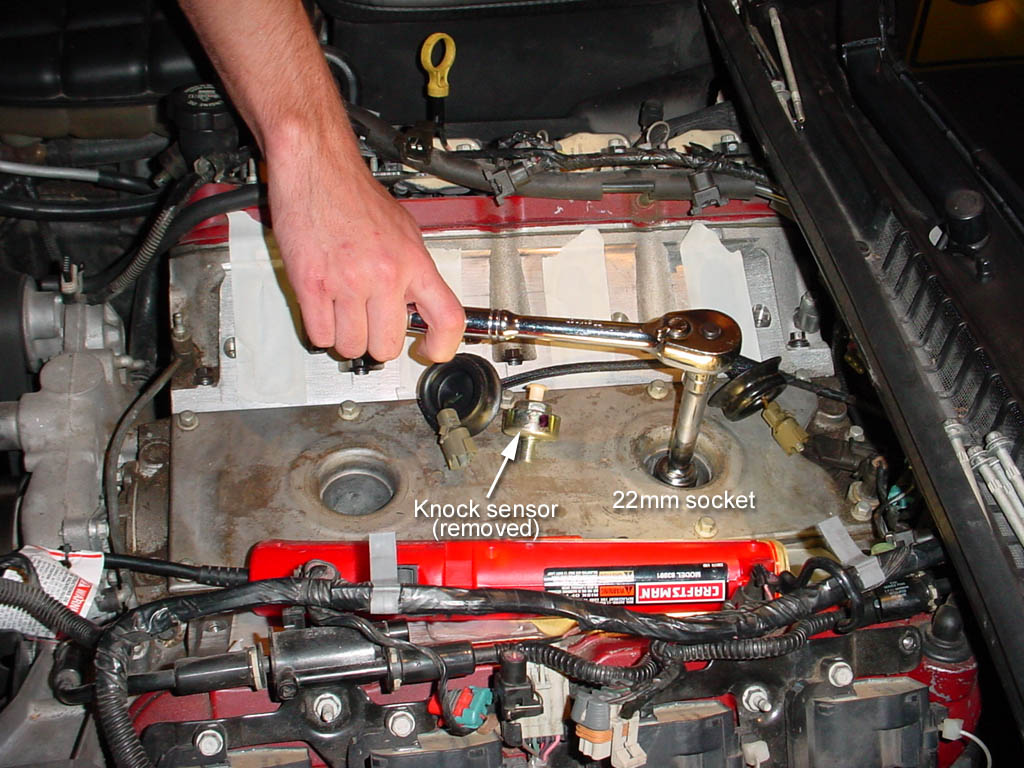
Knock sensor location is one of the biggest variables in this repair. Some engines place the sensor on an exposed area of the block. Others place one or more sensors in the engine valley beneath the intake manifold.
If the intake manifold must be removed, document hose, connector, and bracket locations before disassembly. Follow the manufacturer’s removal order and protect open intake ports from dirt and dropped hardware.
Easy-access location
You may be able to reach the sensor directly after removing a small number of covers or brackets.
Under-manifold location
Some engines require intake manifold removal before the sensor can be reached.
Multiple sensors
V-type engines may use separate sensors for different banks, so identify the correct sensor before disconnecting it.
Step 2: Remove the Old Knock Sensor
Disconnect the electrical connector before removing the sensor fastener unless the service procedure specifies a different sequence. Release connector locks carefully because old plastic can become brittle from engine heat.
Remove the retaining fastener with the correct tool. Once the sensor is loose, compare the old part with the replacement. Check the connector, mounting surface, fastener, and sensor shape before installing the new unit.
Do not pull the wiring
Pulling directly on the wires can damage terminals or break conductors inside the insulation.
Check the old mounting area
Look for oil, corrosion, debris, damaged threads, or other conditions that could interfere with installation.
Step 3: Prepare and Position the New Sensor
Clean the mounting surface only as directed by the manufacturer. The sensor must seat correctly against the specified surface. Avoid adding sealant, washers, coatings, or anti-seize unless the service procedure specifically calls for them.
Some knock sensors have a required orientation or angle. Position the replacement exactly as specified instead of assuming that any orientation will work. The correct mounting position can be part of the sensor’s operating requirements.
Use the correct surface
The sensor should contact the intended mounting surface without dirt, loose corrosion, or other unwanted material.
Follow orientation instructions
If the manufacturer specifies an angle or direction, reproduce it during installation.
Avoid unapproved compounds
Thread sealant and anti-seize can change clamping conditions or electrical behavior, so use them only when the vehicle procedure specifies them.
Step 4: Torque the Knock Sensor Correctly
Correct torque is one of the most important parts of knock sensor installation. The sensor relies on a controlled mechanical connection to the engine, so both under-tightening and over-tightening can create problems.
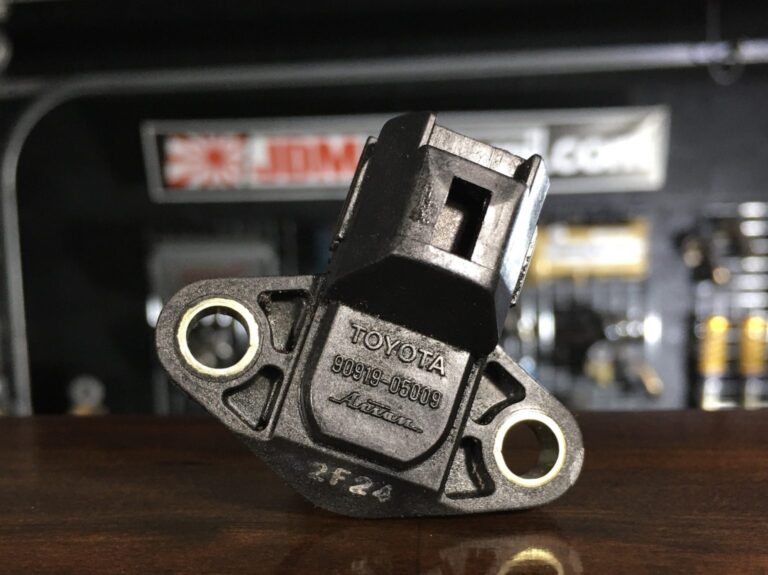
There is no single universal knock sensor torque value. For example, published service procedures for some Toyota applications specify approximately 20 N·m, while other engines use different values. The correct specification for your vehicle must come from the applicable service information.
Use a calibrated torque wrench that covers the required range. Tighten the fastener smoothly and do not use impact tools for final torque. If the manufacturer’s procedure specifies a particular fastener, washer, sealant, or tightening sequence, follow that procedure exactly.
Never guess the torque
A value that works on one engine can be incorrect for another engine or sensor design.
Do not over-tighten
Excessive clamping force can damage the sensor or alter the conditions under which it detects vibration.
Do not leave it loose
Insufficient clamping force can prevent the sensor from being mounted correctly and can affect its signal.
Reconnect the Wiring and Reassemble the Engine
After the sensor is secured, reconnect its electrical connector until the locking mechanism is fully engaged. Inspect the harness routing before installing covers or other components. The wiring should not be stretched, pinched, trapped beneath a fastener, or routed against an exhaust component.
If you removed an intake manifold, throttle body, fuel system component, coolant hose, or other assembly, reinstall each component according to the vehicle-specific procedure. Some procedures require new intake gaskets or other seals after removal.
Do not skip fluid checks after a repair that required draining coolant or disturbing another fluid system. Before starting the engine, verify that all required connectors and hoses are connected and that no tools or loose parts remain in the engine compartment.
Source: micro-tronik.com
Connector
Make sure the connector is fully seated and locked rather than merely touching the sensor terminals.
Harness routing
Keep the harness away from exhaust heat, belts, pulleys, sharp edges, and moving components.
Gaskets
Replace gaskets that the service procedure identifies as single-use or that must be replaced after component removal.
Fluid inspection
Check for coolant, fuel, oil, or vacuum leaks when the repair involved systems that can be disturbed during access.
What to Check Before Starting the Engine
A careful pre-start inspection can prevent a second repair. Compare the engine compartment with your notes or photographs and confirm that every removed component has been returned to its proper position.
Pay particular attention to connectors and hoses around an intake manifold. A disconnected vacuum hose or electrical connector can create a new fault that makes it appear that the knock sensor repair failed.
Electrical connectors
Confirm that all connectors removed during the repair are fully installed.
Vacuum and coolant hoses
Verify that hoses are connected and clamps are positioned correctly.
Fasteners
Check that removed brackets, covers, and other components have their required fasteners.
Test the Knock Sensor Repair
After reassembly, start the engine and check for abnormal noises, warning lights, fluid leaks, and other problems. Let the engine reach the appropriate operating condition while following the vehicle manufacturer’s post-repair inspection procedure.
If a diagnostic trouble code was stored before the repair, clearing the code may be appropriate after the repair. However, clearing a code does not prove that the problem is fixed. The important test is whether the vehicle completes the required diagnostic checks without the fault returning.
A road test should follow the manufacturer’s safety and diagnostic instructions. If the vehicle continues to show a knock sensor fault, do not assume that another sensor is automatically required. Recheck the connector, wiring, mounting, torque, sensor part number, and related engine conditions.
Source: hitchesguide.com
Check the warning light
Determine whether the check engine light remains illuminated or returns after the vehicle completes its diagnostic checks.
Rescan the vehicle
Use the scanner to determine whether the original fault code remains or a new code has appeared.
Inspect live data when available
Vehicle-specific scan data can provide additional information about the knock control system.
Watch for leaks
Inspect the engine compartment after operation if the repair required removal of coolant, fuel, intake, or other components.
What If the Knock Sensor Code Comes Back?
A returning code means the diagnosis needs another look. Start with the basics: confirm the correct replacement part, connector engagement, wiring condition, sensor mounting, and specified torque. A new sensor cannot compensate for a damaged circuit.
If those checks are correct, follow the diagnostic procedure for the exact trouble code and vehicle. Some manufacturers specify resistance tests, circuit checks, or other procedures that must be performed under particular conditions. Do not substitute a generic resistance value for a vehicle-specific specification.
Code returns immediately
Check the connector, wiring, sensor compatibility, and circuit before assuming the replacement sensor is defective.
Code returns during driving
Inspect the harness and sensor mounting and follow the vehicle-specific diagnostic procedure under the conditions that triggered the fault.
Engine actually knocks
Investigate the underlying combustion problem rather than treating the knock sensor as the cause.
Common Knock Sensor Installation Mistakes
Most installation problems come from using information for the wrong engine, overlooking the wiring, or treating the sensor like an ordinary bolt-on component. The repair can look complete while still leaving the control system with an unreliable signal.
Avoid shortcuts that change the manufacturer’s specified installation conditions. In particular, do not assume that adding thread compound, changing the sensor orientation, or tightening the sensor by feel will produce the same result as the documented procedure.
Source: youtube.com
Using the wrong sensor
A sensor that physically fits may still have different electrical or operating characteristics from the required part.
Guessing the torque
Knock sensor torque varies by application, so a generic value should not replace the vehicle-specific specification.
Ignoring wiring damage
A broken, corroded, or poorly connected circuit can produce a fault even when the sensor is new.
Adding unapproved sealant
Extra material can change the sensor’s mounting conditions or interfere with the intended installation.
Skipping gasket replacement
Reusing a required single-use gasket can create vacuum, intake, coolant, or other leaks depending on the component removed.
Clearing codes without diagnosis
Erasing a trouble code only removes stored information; it does not repair the underlying fault.
When You Should Use a Professional Repair Shop
Consider professional service when the sensor is buried beneath an intake manifold, when specialized tools are required, when the repair involves fuel or coolant systems, or when the vehicle-specific diagnostic procedure is beyond your available equipment.
Professional help is also appropriate when the engine is actively knocking, overheating, misfiring, or showing other symptoms that could indicate a problem beyond the sensor circuit. Replacing a sensor without addressing a genuine combustion problem can leave the underlying engine risk unresolved.
Limited access
A sensor located beneath a major engine component can turn a simple replacement into a significant disassembly job.
Diagnostic uncertainty
If the code returns after replacement and basic wiring checks, additional diagnostic equipment may be needed.
Engine damage concerns
Persistent pinging, severe engine noise, overheating, or misfire symptoms warrant diagnosis of the underlying engine condition.
A Simple Knock Sensor Installation Checklist
Before considering the repair complete, use a short checklist to confirm that the sensor, mounting, electrical circuit, and surrounding components have all been addressed. This is especially useful when the sensor required substantial engine disassembly.
The most important point is that installation details are vehicle-specific. A general guide can explain the process, but the exact torque, orientation, diagnostic values, gasket requirements, and disassembly sequence should come from the service information for the specific engine.
Source: youtube.com
Before removal
Confirm the correct sensor, location, diagnostic code, tools, and vehicle-specific installation procedure.
During removal
Protect connectors and wiring and keep dirt away from open engine passages.
During installation
Use the correct mounting surface, orientation, fastener, and manufacturer-specified torque.
During reassembly
Reconnect every connector and hose and install required new gaskets or seals.
After installation
Inspect for leaks, scan for codes, and complete the prescribed post-repair checks and road test.
How to Know the Installation Was Successful
A successful repair means more than seeing a new sensor attached to the engine. The connector must be secure, the sensor must be installed according to the specified orientation and torque, the engine must be reassembled correctly, and the original fault should not return during the applicable diagnostic checks.
If the vehicle continues to exhibit abnormal combustion, warning lights, or related diagnostic codes, stop treating the sensor replacement as the final diagnosis. The next step is to follow the vehicle-specific troubleshooting procedure and determine whether the problem is electrical, mechanical, or related to actual engine knock.
No installation leaks
The engine should remain free of leaks caused by components disturbed during the repair.
Secure connection
The sensor connector and harness should remain properly connected and routed.
No returning fault
The original diagnostic problem should remain resolved after the required monitoring and testing conditions are met.
Frequently Asked Questions
Q
Can I install a knock sensor myself?
Yes, a mechanically experienced vehicle owner can install some knock sensors with ordinary hand tools and a torque wrench. The difficulty depends heavily on the vehicle because some sensors are easy to reach while others are located beneath an intake manifold or other major components.
Use the service procedure for the exact engine before beginning. If the repair requires fuel-system work, extensive intake disassembly, specialized diagnostics, or procedures you cannot safely perform, professional service is the safer option.
Q
How tight should a knock sensor be?
A knock sensor should be tightened to the exact torque specified for the particular vehicle and engine. There is no universal torque setting for every knock sensor.
Correct torque matters because the sensor depends on its mechanical mounting to detect engine vibration properly. Over-tightening or under-tightening can affect operation or damage the sensor.
Q
Does a knock sensor need sealant?
Not necessarily. Whether sealant, thread compound, anti-seize, or another material is permitted depends on the specific sensor and engine procedure.
Do not add a compound simply because it is commonly used on other automotive fasteners. Follow the manufacturer’s instructions because added material can change tightening conditions or the sensor’s intended mounting.
Q
Do I need to disconnect the battery to replace a knock sensor?
Battery disconnection depends on the vehicle-specific service procedure. Some repairs call for disconnecting the battery before electrical work, while other procedures may not require it.
If you disconnect the battery, be aware that some vehicles can lose learned settings or require additional procedures afterward. Follow the instructions for the exact vehicle.
Q
Can a new knock sensor still show a fault code?
Yes. A new sensor does not guarantee that the entire knock sensor circuit is working correctly. Damaged wiring, corroded terminals, an incorrect sensor, poor mounting, incorrect torque, or another engine-control problem can cause the fault to remain.
If the code returns, rescan the vehicle and follow the manufacturer’s diagnostic procedure instead of automatically replacing another part.
Q
Where is a knock sensor usually located?
Knock sensors are commonly mounted on the engine block or another location specified by the engine manufacturer. Exact placement varies widely by engine design.
Some engines have one sensor, while others use multiple sensors. V-type engines may have separate sensors associated with different cylinder banks, and some designs place the sensors beneath the intake manifold.
Q
How long does it take to install a knock sensor?
Installation time varies too much between vehicles to give one reliable universal estimate. An accessible sensor can be relatively straightforward, while a sensor beneath an intake manifold can require substantial additional disassembly and reassembly.
The service procedure for the exact year, model, and engine gives a better indication of the work involved than a general time estimate.
✦ Wrapping Up
Conclusion
Learning how to install a knock sensor starts with identifying the correct sensor and the exact procedure for your engine. The core process is straightforward: diagnose the fault, gain access, disconnect and remove the old sensor, prepare the mounting area, install the replacement at the specified orientation and torque, reconnect the wiring, and verify the repair.
The details matter. Knock sensor torque, orientation, sealant requirements, wiring tests, gasket replacement, and post-repair diagnostics can all vary by vehicle. Avoid generic specifications when the manufacturer provides a vehicle-specific value.
If the warning light or knock-related fault returns after installation, continue with diagnosis rather than repeatedly replacing parts. Checking the wiring, connector, mounting, sensor compatibility, and underlying engine condition can help identify the actual cause.
💡 Key Takeaway
Before installing a knock sensor, obtain the service information for your exact vehicle and confirm the sensor part number, location, installation angle, torque specification, wiring procedure, and post-repair test.
Ethan Brooks is an automotive writer at Auto News 7, covering car news, vehicle maintenance, new model updates, recalls, and practical buying guides. He focuses on clear, useful information that helps drivers understand their vehicles and make better ownership decisions.
Learn whether a camshaft sensor is covered under a powertrain warranty, what affects coverage, common exceptions, and how to file a warranty claim in the United States.
Learn how to replace camshaft position sensor connector wiring safely. Follow step-by-step instructions, tools needed, troubleshooting tips, and common mistakes to avoid.
Learn what the camshaft sensor controls, how it works with the engine computer, common failure symptoms, and why it is essential for fuel injection, ignition timing, and engine performance.
Learn how to check camshaft position sensor operation, wiring, voltage, and signal output. Follow this practical step-by-step guide to diagnose common camshaft sensor problems.
Learn how many camshaft sensors a car has, why the number varies by engine design, where they are located, and how to identify the correct sensor on your vehicle.