To replace a coolant temperature sensor, work only on a completely cold engine, identify the correct sensor for your vehicle, relieve or drain coolant pressure as required, disconnect the electrical connector, remove the old sensor, install the replacement using the specified seal and torque, restore the coolant level, bleed the cooling system when required, and verify that the engine reaches normal operating temperature without leaks or warning lights.
For drivers in the United States, replacing an engine coolant temperature sensor can be a manageable DIY repair, but the exact procedure depends on the vehicle’s year, make, model, engine, and sensor design. The sensor may be threaded into the cylinder head, engine block, intake manifold, thermostat housing, or another coolant passage. Some vehicles use an O-ring or sealing washer rather than thread sealant, so the vehicle-specific repair procedure should determine how the replacement is installed.
The coolant temperature sensor, commonly called an ECT sensor, measures engine coolant temperature and sends that information to the engine control module. The control module can use the signal for fuel control, ignition-related decisions, cooling-fan operation, and temperature information displayed to the driver. A faulty sensor can produce symptoms such as an inaccurate temperature gauge, hard starting, poor fuel economy, a Check Engine light, or abnormal cooling-fan behavior, but those symptoms can also have other causes. Diagnose the fault before replacing the part.
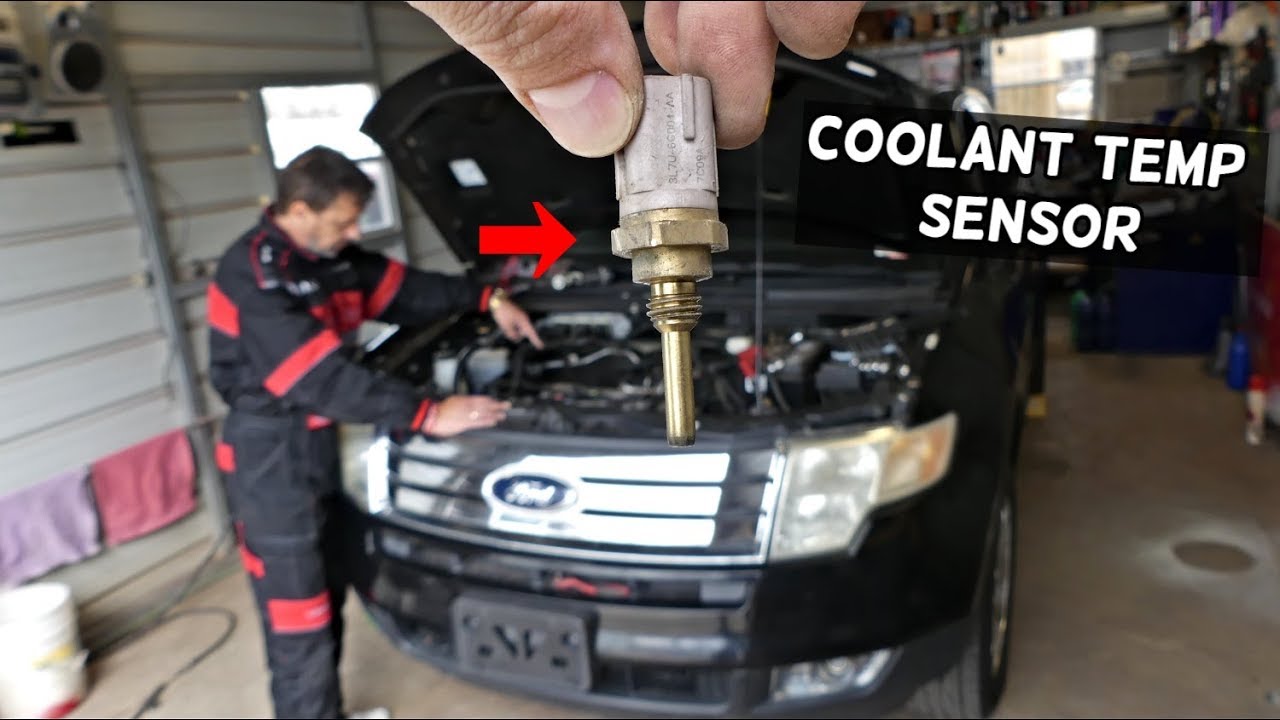
Source: www.youtube.com
What You Need Before Replacing the Coolant Temperature Sensor
Gather the correct replacement part and tools before starting. The exact socket or wrench size, access requirements, coolant type, sealing method, and torque specification vary by vehicle. Check the owner’s manual, factory service information, or a reliable vehicle-specific repair procedure before removing the old sensor.
Because coolant can escape when the sensor is removed, have a suitable drain pan and enough manufacturer-specified coolant available to restore the system. Wear safety glasses and chemical-resistant gloves, and keep coolant away from children and animals because automotive coolant can be toxic.
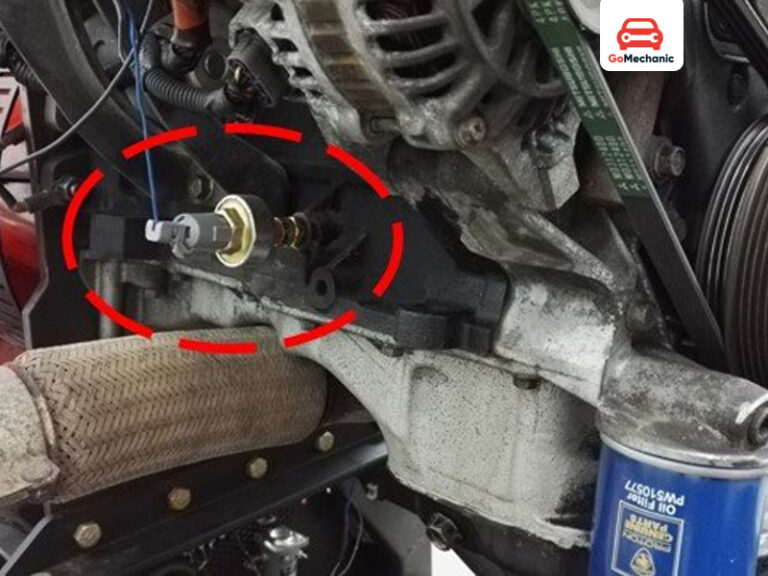
Source: gioetczzi.blob.core.windows.net
Replacement sensor
Verify the part number and fitment for the exact year, make, model, engine, and application. Do not rely only on physical appearance.
Hand tools
Prepare the correct socket or wrench, ratchet, extensions, and a small screwdriver or pick if needed for the electrical connector.
Torque wrench
Use a torque wrench when the manufacturer provides a sensor torque specification. Sensor housings or engine components can be damaged by excessive tightening.
Coolant and drain pan
Use the coolant specification required for the vehicle and collect drained coolant in a suitable container for proper recycling or disposal.
Safety equipment
Use safety glasses, gloves, suitable clothing, and safe lifting equipment when access underneath the vehicle is necessary.
Confirm That the Sensor Is Actually the Problem
Do not replace the sensor solely because a scan tool produced a coolant-temperature-related trouble code. Check the connector, wiring, coolant level, and sensor data when appropriate. A faulty thermostat or another cooling-system problem can create similar symptoms, and an inaccurate temperature reading does not automatically prove that the sensor itself has failed.
If a scan tool is available, compare the reported coolant temperature with the engine’s actual condition and the manufacturer’s diagnostic specifications. On a cold engine that has been sitting for several hours, the reported coolant temperature should generally be plausible relative to ambient conditions. Exact diagnostic limits depend on the vehicle.
Inspect the connector
Look for broken locking tabs, loose terminals, corrosion, damaged insulation, or coolant contamination.
Check the wiring
Follow the harness from the sensor far enough to identify obvious cuts, chafing, melted insulation, or poor repairs.
Check for other faults
Consider thermostat, cooling-fan, coolant-level, radiator, water-pump, and wiring problems when the symptoms do not match a failed sensor.
How to Replace Coolant Temperature Sensor
The general replacement sequence is straightforward, but the vehicle-specific procedure takes priority. Some sensors are threaded into a coolant passage, while others are retained by a clip and sealed with an O-ring. Some applications require partial or complete coolant drainage; others allow only a small amount of coolant loss if the sensor is positioned high in the system.
Never open a pressurized cooling system while the engine is hot. Hot coolant can cause severe burns. Park on a level surface, set the parking brake, switch the engine off, and allow the engine to cool completely before proceeding.
Source: cenhufdy.blob.core.windows.net
Step 1: Make the vehicle safe
Park on a level surface, switch the ignition off, allow the engine to become completely cold, and use approved lifting equipment if access underneath the vehicle is required.
Step 2: Relieve cooling-system pressure
Only when the engine is completely cold, carefully remove or loosen the appropriate pressure cap according to the vehicle’s service procedure. Do not remove a hot radiator or expansion-tank cap.
Step 3: Locate the sensor
Use vehicle-specific service information to identify the correct ECT sensor. Common locations include the thermostat housing, cylinder head, engine block, and intake manifold.
Step 4: Drain coolant as required
If the sensor sits below the coolant level, drain enough coolant to prevent excessive loss. Some vehicles require a more extensive draining procedure.
Step 5: Disconnect the electrical connector
Release the connector lock and pull on the connector body rather than the wires. If the connector is brittle, avoid excessive force.
Step 6: Remove the old sensor
Use the specified socket or wrench and carefully remove the sensor. Be prepared for coolant to escape from the opening.
Step 7: Prepare the sealing surface
Clean dirt and coolant residue from the mounting area without allowing debris to enter the coolant passage. Remove the old sealing washer or O-ring if the design requires replacement.
Step 8: Install the new sensor
Install the correct new seal, O-ring, or specified sealant as required by the manufacturer. Start threaded sensors by hand to avoid cross-threading, then tighten to the specified torque.
Step 9: Reconnect the wiring
Push the electrical connector fully onto the sensor until its locking mechanism engages. Make sure the harness is routed away from hot or moving components.
Step 10: Refill the cooling system
Close the drain point if it was opened and refill with the specified coolant using the vehicle manufacturer’s filling procedure.
Step 11: Bleed trapped air
Follow the vehicle-specific bleeding or air-purging procedure. Some cooling systems use bleed screws, vacuum filling equipment, a prescribed warm-up cycle, or other procedures.
Step 12: Inspect and test
Start the engine according to the manufacturer’s procedure, monitor the temperature, inspect the sensor area for leaks, and verify that the cooling system reaches normal operating conditions.
Threaded Sensor Versus Clip-In Sensor
Threaded sensors screw directly into a coolant passage and normally require a specified torque. Depending on the application, the replacement may have factory-applied sealant, an O-ring, or another sealing arrangement. Do not automatically add thread sealant or tape if the manufacturer does not specify it.
Clip-in sensors use a retaining clip and usually seal against the coolant passage with an O-ring. Replace the O-ring when the service procedure calls for it, lubricate it only when specified, and make sure the retaining clip is fully seated.
Threaded design
Use the correct socket, thread treatment, and torque specification for the specific vehicle.
Clip-in design
Confirm that the O-ring and retaining clip are properly positioned before reconnecting the electrical connector.
How to Refill and Bleed the Cooling System After Sensor Replacement
Correctly restoring coolant is as important as installing the sensor. Introducing air into the cooling system can interfere with coolant circulation and temperature control, and some vehicles require a specific bleeding procedure after coolant has been drained.
Use only the coolant type and mixture specified for the vehicle. Do not assume that every vehicle uses the same coolant chemistry or that mixing different coolant types is acceptable. If the manufacturer’s procedure calls for a vacuum fill, bleed screw, special funnel, or a particular warm-up sequence, follow that procedure rather than relying on a generic method.
Source: hitchesguide.com
Refill to the specified level
Fill the radiator, expansion tank, or designated filling point according to the vehicle’s service procedure.
Remove trapped air
Use the manufacturer’s specified bleeding method. Air-removal procedures differ substantially among modern vehicles.
Monitor temperature
Watch the temperature gauge or scan-tool data while the engine warms. Stop the engine if it overheats or coolant escapes abnormally.
Recheck the level
After the engine has cooled again, check the coolant level and adjust it according to the manufacturer’s instructions.
Why Air in the Cooling System Matters
Air pockets can reduce effective coolant circulation and may cause unstable temperature readings or localized overheating. This is why a simple top-off may not be enough on some vehicles after the cooling system has been opened.
Vehicle-specific procedure
Follow the factory or service-manual bleeding procedure rather than assuming all cooling systems can be bled the same way.
Check Your Work After Installing the New Sensor
A successful coolant temperature sensor replacement should leave the electrical connection secure, the sensor mounting area dry, the coolant at the correct level, and the engine operating normally. The temperature reading should behave consistently as the engine warms.
Inspect the sensor and nearby components for coolant leaks after the engine has reached the appropriate operating condition. Then allow the vehicle to cool and recheck the coolant level if the manufacturer’s procedure calls for it.
Source: hitchesguide.com
Check for leaks
Look around the sensor, sealing surface, hose connections, drain points, and other areas disturbed during the repair.
Check the temperature reading
The gauge or scan-tool temperature should behave consistently with the engine warming normally.
Check warning lights
If a Check Engine light remains illuminated, scan for diagnostic trouble codes and follow the vehicle-specific diagnostic procedure rather than automatically replacing another part.
Verify cooling-fan operation
Where appropriate, confirm that the cooling fans operate according to the vehicle’s control strategy. Fan operation varies by vehicle and operating conditions.
Recheck after cooling
Once the engine is cold again, verify the coolant level according to the manufacturer’s instructions.
What to Do If the Problem Remains
If the temperature reading remains incorrect, the engine continues to overheat, or the original symptoms return, stop treating the sensor as the only possible cause. Recheck the connector and wiring, confirm the correct part was installed, scan for diagnostic codes, and inspect the thermostat and cooling system as appropriate.
Persistent overheating should not be ignored. Continuing to drive an overheating engine can cause serious engine damage, and a coolant temperature sensor replacement does not repair a mechanical cooling-system fault.
Temperature still reads incorrectly
Inspect sensor wiring, connector terminals, sensor fitment, and diagnostic data.
Engine still overheats
Investigate coolant level, air in the system, thermostat operation, radiator condition, cooling fans, water pump, and other applicable causes.
Coolant leaks from the sensor
Stop and inspect the seal, threads, O-ring, retaining clip, mounting surface, and torque specification.
Check Engine light remains
Read the stored codes and diagnose the underlying circuit or temperature-control fault before replacing additional components.
Common Coolant Temperature Sensor Replacement Mistakes
Most problems after an ECT sensor replacement come from using the wrong part, damaging the connector, using an incorrect sealing method, over-tightening the sensor, or failing to restore and properly bleed the coolant system. Avoiding these mistakes is often more important than having an extensive collection of tools.
The most important limitation is that there is no universal torque value or universal coolant-filling procedure for every vehicle. Published service information for individual vehicles demonstrates that specifications can differ substantially, so a generic torque number should never be substituted for the correct specification.
Source: hitchesguide.com
Working on a hot engine
Never remove a pressure cap or sensor from a hot, pressurized cooling system.
Replacing the wrong sensor
Some vehicles have multiple temperature sensors or switches. Confirm the component by application and service information.
Guessing the torque
Sensor torque varies by application. Excessive force can damage the sensor, threads, housing, or engine component.
Adding sealant automatically
Some sensors use sealant, some have factory-applied sealing material, and others use an O-ring or washer. Use only the specified sealing method.
Pulling on the wiring
Disconnect the connector from its body or locking mechanism rather than pulling the wires.
Ignoring trapped air
If the cooling system requires a specific bleeding procedure, skipping it can create temperature-control problems even when the new sensor is installed correctly.
Assuming every overheating problem is a sensor problem
An ECT sensor reports temperature; replacing it does not correct a failed thermostat, water pump, radiator, fan, low coolant condition, or other mechanical fault.
Improper coolant disposal
Collect coolant instead of allowing it to drain onto the ground, and dispose of or recycle used coolant according to local requirements.
When You Should Use a Professional
A professional repair is appropriate when the sensor is difficult to access, the component is installed in a fragile housing, the cooling system requires specialized filling equipment, the sensor is seized, the vehicle continues to overheat, or diagnosis points to a wiring or control-system fault.
If you cannot safely support the vehicle, control coolant spills, or verify the correct repair procedure, do not proceed with the replacement. A small sensor repair can become an expensive engine or cooling-system repair when safety or installation requirements are ignored.
Seized sensor
Do not apply excessive force that could damage an aluminum head, manifold, housing, or threaded passage.
Persistent overheating
Stop driving the vehicle until the overheating condition is diagnosed and corrected.
Complex coolant system
Use professional service when the vehicle requires specialized bleeding, vacuum filling, or access procedures you cannot perform safely.
Frequently Asked Questions
Q
How do I know if my coolant temperature sensor needs to be replaced?
Possible signs include an inaccurate or erratic temperature gauge, hard starting, poor fuel economy, abnormal cooling-fan behavior, a Check Engine light, or temperature-related diagnostic trouble codes. These symptoms do not prove that the sensor has failed because wiring, the thermostat, cooling system, or other components can produce similar symptoms.
Q
Do I need to drain all the coolant to replace the temperature sensor?
Not always. If the sensor is mounted high in the engine, only a small amount of coolant may escape. If the sensor is below the coolant level, enough coolant may need to be drained to lower the level beneath the sensor. The correct procedure depends on the vehicle.
Q
Should I use thread sealant on a new coolant temperature sensor?
Only when the vehicle or sensor manufacturer specifies it. Some sensors use thread sealant, some have factory-applied sealing material, and others seal with an O-ring or washer. Adding an unapproved sealant or tape can interfere with installation or torque.
Q
Do I need to bleed the cooling system after replacing an ECT sensor?
If coolant was drained or air entered the system, the vehicle may require a bleeding or air-purging procedure. The method varies by vehicle, so follow the manufacturer’s instructions rather than assuming that simply topping off the reservoir removes all trapped air.
Q
What should I do if the car still overheats after replacing the coolant temperature sensor?
Stop treating the sensor as the only possible cause. Check the coolant level and air-bleeding procedure, then diagnose the thermostat, radiator, cooling fans, water pump, wiring, and other relevant components. Do not continue driving an engine that is overheating because severe engine damage can result.
✦ Wrapping Up
Conclusion
Replacing a coolant temperature sensor is usually a manageable repair when the sensor is accessible and the vehicle-specific procedure is followed. The essential sequence is to start with a cold engine, identify the correct sensor, control coolant loss, disconnect the wiring safely, install the new sensor with the correct seal and torque, restore the coolant, bleed trapped air when required, and inspect the system for leaks and proper temperature operation.
The most important part of the job is not simply removing and installing the sensor. Correct diagnosis, correct part selection, vehicle-specific torque and sealing requirements, and proper cooling-system filling determine whether the repair is successful. If the engine continues to overheat or the temperature reading remains abnormal, further diagnosis is necessary.
💡 Key Takeaway
Before starting the repair, obtain the exact service procedure for your vehicle’s year, make, model, and engine. Use that procedure for the sensor location, coolant requirements, sealing method, torque specification, and cooling-system bleeding process.
Ethan Brooks is an automotive writer at Auto News 7, covering car news, vehicle maintenance, new model updates, recalls, and practical buying guides. He focuses on clear, useful information that helps drivers understand their vehicles and make better ownership decisions.
Learn whether a knock sensor is covered under a powertrain warranty, what factors affect coverage, common warranty exclusions, and how to verify your vehicle’s protection.
Learn how many camshaft sensors a car has, why the number varies by engine design, where they are located, and how to identify the correct sensor on your vehicle.
Learn whether a bad knock sensor can cause stalling, how it affects engine performance, common symptoms, diagnostic steps, and when replacement may be necessary.
Learn how to fix a camshaft position sensor with step-by-step troubleshooting, testing, replacement instructions, common symptoms, costs, and repair tips.
Learn when to replace a crankshaft position sensor, how to recognize failure symptoms, diagnose the problem, and avoid replacing a good sensor unnecessarily.